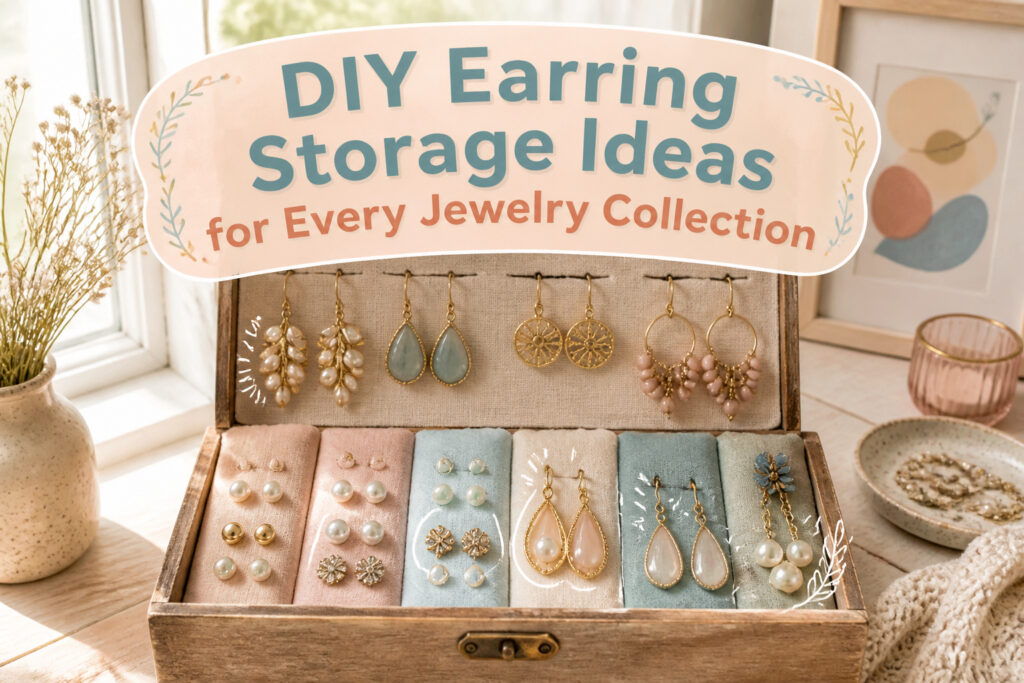
The right earring storage depends on how often you rotate pairs and what you are willing to build. A gallery wall of mesh-backed frames takes ten minutes and stays under $20, but dust settles on open faces fast enough to matter only if you wear them weekly. Someone who reaches for studs daily needs a closed drawer or a lidded box instead; the ice cube tray that costs nothing already in your kitchen keeps pairs separated but fails the moment a dangle exceeds an inch.
1. Picture Frame Earring Holder
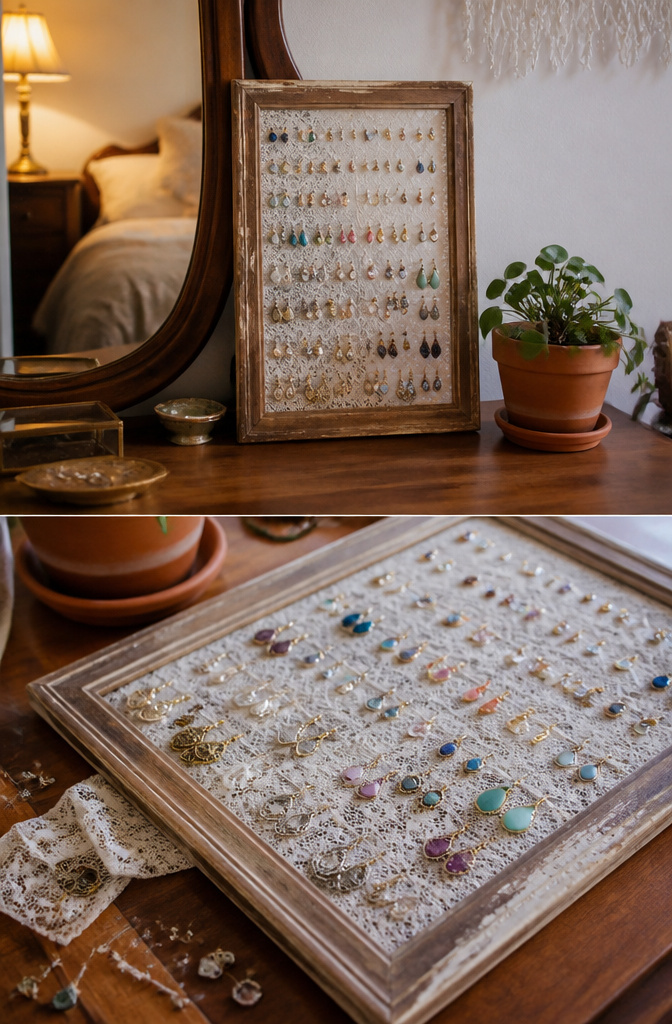
An old picture frame with the glass and backing pulled out becomes a ready-made earring holder once mesh or fabric stretches across the opening. The screen holds hooks and posts in neat rows, and because the frame itself is already finished, the project runs about 10 minutes from start to hang and stays under $20 even if you buy the mesh new. Lace works for a softer look, wire grid for something more industrial; a distressed wooden frame reads farmhouse, while black or metal leans modern. What convinced me, reading through the options, is how many DIYers build a whole gallery wall of these in mixed sizes, small frames for everyday studs and larger ones for statement dangles. The open face means dust settles, so this suits someone who wears earrings often enough that they rotate through before grime builds.
2. Wire Mesh Earring Holder

A wooden frame with wire mesh stretched across the back makes a storage solution that actually earns its wall space. The grid, also called hardware cloth, holds everything from small studs to heavy dangling earrings without sagging, and the open weave lets you scan your collection in one glance.
What convinced me, reading through the build descriptions, is how the material adapts. Fabric or cork would buckle under a statement piece; mesh stays rigid. Yet the same grid is fine enough for everyday studs. You can cut it to fit a tabletop stand or a full wall display, and the frame choice shifts the whole look. A weathered wood frame reads farmhouse; black or silver metal reads modern. For something sharper, spray the mesh copper or rose gold and paint the frame matte black. The contrast lands better than matching everything.
The one catch is hoop earrings. They hang fine, but smaller diameters can slip through depending on the grid size. A half-inch mesh spacing handles most hoops; anything tighter and you trade visibility for security.
3. Fabric and Cork Board Organizer

A cork board covered in fabric gives earrings a soft landing that bare cork alone never quite matches. The fabric adds just enough resistance that studs push in cleanly and stay put, while dangles slip through without snagging. I learned the hard way that loose weave patterns catch on butterfly backs; a tighter cotton or linen saves that headache entirely.
The real payoff comes when you want this setup inside a box or drawer rather than on the wall. Cut your felt pieces one quarter inch shorter than the box’s inside dimensions in both length and width. That slight gap lets the fabric-wrapped panel slide in without bunching at the corners, and the compression holds it steady without glue. Two felt layers stitched around a plastic canvas core, with a folded tab at one end for pulling, turns any shallow container into an organizer you can lift out whole.
Studs work best pushed directly through the felt into the cork behind. For heavier dangles, the fabric face takes the weight while the cork anchors the hook. Keep the board shallow, under two inches deep, or you lose the light, dorm-room-friendly portability that makes this worth building over buying.
4. Upcycled Cheese Grater

A cheese grater with a coat of paint stands upright on a dresser or hangs flat against the wall, and its holes line up like a ready-made rack for dangle earrings. The metal ridges grip hooks securely, so pairs stay separated and visible instead of tangled in a dish. Spray-paint it in a bold color or a metallic finish like gold or copper before you mount it, and the kitchen-tool origins turn into something that reads as intentional decor.
The sustainability appeal here is straightforward: the grater was already manufactured, already worn in, and headed for donation or landfill before it got a second job. Upcycling skips the production footprint of a new organizer and skips the cost too. Most kitchens have one buried in a drawer with a bent handle or a spot of rust that makes it unpleasant for food but fine for jewelry.
Weight matters. A grater full of heavy statement earrings will tip if it stands freely, so either anchor the base to a small wood block or commit to wall mounting. Hook earrings and lightweight pairs work best; posts and studs tend to fall through or sit crooked. The grater wins on charm and on keeping pairs in pairs, not on accommodating every style you own.
5. Jewelry Stand DIY
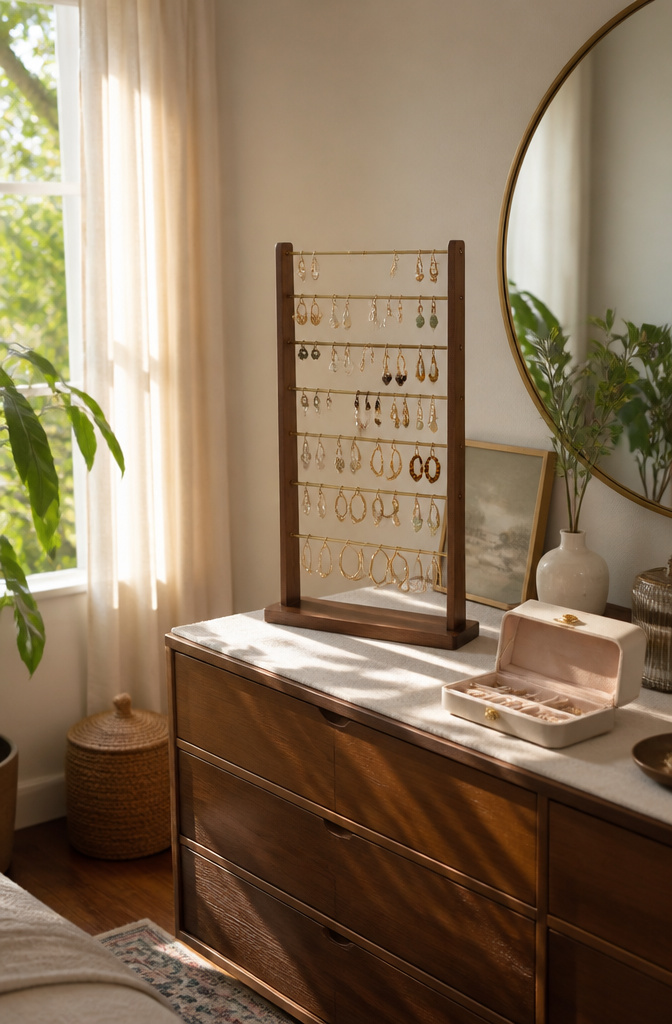
A jewelry stand built from wood or metal rods sits on your dresser instead of taking over wall space, which matters if you rent or just do not want to drill holes. The frame-and-rod construction lets earrings hang in open air so pairs stay visible and untangled, something mesh-backed frames struggle with once studs and hoops crowd the same surface.
Materials run toward wood, wire, or even branches if you want the stand to read as decor first and storage second. Paint or stain matches it to whatever else sits on that surface. Unlike wall-mounted boards or frames, this one moves where you move it, which means you can set it near a window for morning light or tuck it beside a lamp on a crowded vanity.
The tradeoff is footprint. A stand that holds thirty pairs needs base depth to stay upright, and that base eats space a hanging solution would not touch. Two ways to play this: keep the stand narrow and tall for stud-heavy collections, or go wide and low if dangles dominate. The narrow build wins for small surfaces; the low one stays stable when you bump the dresser.
6. Hanging Organizer

A hanging organizer turns the back of a door or the inside of a closet into storage that would otherwise sit empty. Fabric pouches, clear pockets, and mesh panels each handle earrings differently: mesh keeps pairs visible from across the room, while solid fabric hides clutter but forces you to remember which pocket holds what.
The real draw is how the format scales. A small collection fits into a single row of pockets, each pair visible and reachable without digging. A larger collection just needs more vertical real estate, the same organizer extended downward or hung beside another. Lightweight studs and small drops behave best here; anything heavier swings and tangles when the door moves.
Hanging on a closet rod keeps the organizer flat and stable, though over-the-door hooks win for renters who cannot drill. The tradeoff is motion: every time that door opens, the earrings sway. For pieces you grab daily, that rhythm becomes background noise. For fine hooks or fragile settings, it is a reason to look elsewhere.
7. Cork Board with Hooks

A bare cork board handles earring storage with almost nothing added. Push studs straight into the surface, or pin small hooks in rows for dangles and hoops. Cork gives under pressure, so the posts slide in without bending, and the grip is tight enough that lightweight pairs stay put. The material is naturally soft yet firm, which matters more than it sounds if you have delicate wire backs.
The fabric-covered version wins on looks. Stretching linen or cotton over the surface hides the tan grid pattern and softens the whole piece into bedroom décor. That covering also protects the cork from wear, so the board lasts longer. But bare cork works better when you rearrange often or when your collection changes size. Pins and hooks move freely without tearing fabric, and you skip the step of re-stretching material every time you want a new layout.
Paint the frame if you want color, or leave it raw for a minimalist wall. Either way, a single nail or adhesive hook usually holds the weight, which helps in rentals or dorms where Command strips beat drilling. Skip the ribbon strips and elastic bands unless you also need necklace storage; they clutter the surface and make earrings harder to spot at a glance.
8. Rotating Carousel

A rotating jewelry carousel gives a full 360-degree view of every pair at once, which is the main reason it beats any flat tray or drawer for a large collection. Spin the base and the earrings come to you; nothing ends up buried under something else. The rotation itself solves the buried-pair problem that makes flat storage a daily hunt.
These carousels usually stack hooks, tiers, and trays together so studs sit on one level and dangles hang on another. That mixed layout matters when your collection spans both styles. Compact footprints help too, since the vertical build keeps the whole unit from spreading across a dresser.
The tradeoff is height. A carousel needs clearance above it, so it works best on a vanity or wide shelf rather than under a low cabinet. For varied styles and volume, though, the access is hard to match. Flat storage hides half your options by design; rotation brings them all into view every time you spin it.
9. Ice Cube Tray

An ice cube tray sits in the back of most freezers, half-filled with old water or nothing at all. Mine spent two years in this condition before I pulled it out, washed it, and set it on the dresser. Now each compartment holds one pair of earrings, one pair per cube, and the studs I used to lose between jewelry box cracks finally stay put.
This setup works because the walls are just tall enough to keep tiny hoops from rolling together and tangling, but short enough that nothing hides from sight. Studs especially benefit: their backs stay pressed against the plastic, so pairs don’t separate overnight. The tray itself costs nothing if you already own one, and the footprint is small enough to tuck inside a shallow drawer or slide to the back of a vanity.
The limitation is real. Drop earrings with hooks longer than an inch will lean awkwardly, and anything with dangles will tangle across compartments if you bump the tray. For those, the ice cube tray is the wrong tool. But for the small stuff, the earrings that vanish first, it earns its space.
10. Magnetic Strip

A magnetic strip mounted to the wall or inside a cabinet door turns dead space into instant storage with an industrial look that actually earns its place in the room. Lightweight studs and small hoops cling straight to the metal; the pull is just strong enough to hold them without fighting you at 7 a.m. when half your brain is still asleep.
Heavy dangles are the problem here. Anything with length or heft wants to swing, and gravity wins that fight every time. Non-magnetic metals like aluminum or brass posts won’t stick at all, so the pair you reach for most might simply refuse to cooperate. The strip also shows dust and fingerprints more than a fabric board would, so placement matters: inside a cabinet keeps it cleaner, but you lose the decorative payoff.
If your collection runs to delicate gold posts and tiny silver hoops, this is one of the faster installs in the list. A strip, a level, and a few screws, and the earrings are where your eyes land first.
11. Teacup Display
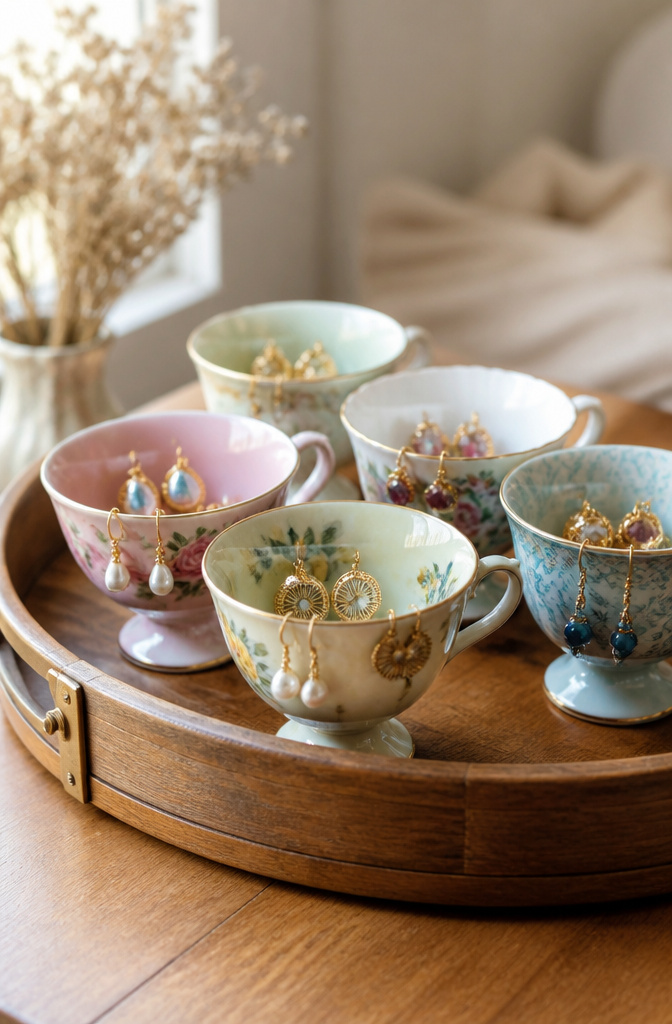
Vintage teacups make a natural home for earrings that spend more time on display than in rotation. The curve of each cup walls off pairs by style, one cup for studs, another for hoops, so nothing tangles. What sold me on the setup was the saucer underneath. A dropped stud rolls maybe an inch and stops on the porcelain instead of vanishing under the dresser.
This works best for smaller collections. The cups are compact, and once you outgrow three or four of them, the arrangement starts looking like clutter rather than decor. I keep mine to earrings I reach for occasionally, not the pair I wear daily. Those live closer to the mirror, where grabbing them does not mean lifting china.
The look is eclectic by default, almost unavoidably so. If your room runs modern and spare, the teacups will read as a deliberate contrast or just mismatched. I have seen them work beautifully in bedrooms with warm wood and already-mixed eras. The trick is committing to the mismatch rather than fighting it. A stack of cups looks planned; a single cup looks like you forgot to put it away. Group at least three, mismatched but within a palette, and the whimsy becomes intentional.
12. Shadow Box Display

A shadow box turns earring storage into something worth looking at. The extra depth matters more than people expect. Standard frames sit about an inch deep, which works for studs lying flat against fabric backing. Dangles and hoops need the two to three inches a true shadow box provides, or the glass presses against the hooks and bends them out of shape over time.
The backing is where the function happens. Line it with felt or velvet, then add small hooks, push pins, or decorative nails for hanging. Statement pieces read like curated art this way, especially when you arrange by metal or color rather than tossing them in random. Wall placement needs a stud or a proper anchor; the filled box weighs more than a standard frame, and a drywall screw alone pulls loose within a month. Two inches of depth minimum for anything that hangs is the rule I would not bend on, even if the shallower frame looks right in the store.
For a smaller collection, the shadow box doubles as the only organizer you need. For larger ones, it becomes the display case for favorites while daily pieces live somewhere easier to reach.
13. Jewelry Drawer Organizer

A drawer insert with compartments built specifically for jewelry turns any dresser drawer into a hidden earring station. The felt lining matters more than I expected at first. Soft material against soft material prevents the scratching that happens when metal backs slide against wood grain or plastic edges. Sources describe inserts designed to separate earrings by type, size, or color, which sounds basic until you actually sort a collection and realize the compartment size decides what fits where. Small squares keep studs paired and upright. Slightly wider rectangles handle hoops without forcing the curve flat. Longer slots work for dangly pieces that tangle if folded. The inserts keep everything dust-free and out of sight, which I prefer for a small collection that does not need countertop display. One warning: measure your drawer interior before ordering. A quarter-inch off and the insert shifts every time you open or close. The best setup I have seen sits flush with the drawer sides, the felt lining rising just enough to cradle the earring backs without swallowing them.
14. Hanging Ribbon

A one-and-a-half to two-inch grosgrain ribbon gives stud posts enough surface to grip without the earrings sliding into a fold. Anything narrower and the backs work loose; anything wider wastes wall space and obscures half the pair.
I learned the hard way that fishing line looks invisible in the hardware store and stays invisible once earrings are on it. Twine frays and darkens where the metal rubs. Ribbon keeps its color, and the slight ribbed texture catches the light so you can actually see what you own.
Stretch the ribbon taut between two points on a frame or directly on the wall, anchor it with upholstery tacks or a staple gun every six inches, and leave a little sag, maybe an eighth of an inch, so the weight of dangles does not pull the middle into a V. For heavier pieces, a thin strip of cork board behind the ribbon, pinned through both layers, stops the ribbon from bowing outward.
The frame route, stripped of glass and backing, gives the whole thing structure and a finished edge. A bare wall stretch reads cleaner if your collection is the point, not the holder. Either way, ribbon wins on speed: five minutes, no glue drying, no mesh to tension.
15. DIY Pegboard

A pegboard from the hardware store solves earring storage with almost no modification. The standard perforated board, meant for garage tools, takes small hooks or dowels that let earrings hang in open rows. You see everything at once, which matters when a pair of studs disappears behind a cluster of hoops.
Spacing the hooks is where the customization happens. A modest collection of mostly studs needs hooks every few inches, maybe two or three rows. Someone accumulating longer dangles or statement pieces will want wider gaps between hooks, or the earrings tangle against each other and the board looks crowded fast. The holes are already drilled on a grid, so moving a hook takes seconds; the board adapts as the collection grows or shrinks.
Paint is optional. The raw brown masonite works for a utilitarian look, or a quick coat in whatever color matches the wall. The real decision is wall space versus drawer space: this lives on the wall, visible, which is either the point or the problem depending on how finished the bedroom looks.
Why Storage Matters for Earrings

A cluttered jewelry box does more than slow your morning down. Earrings are some of the smallest accessories we own, and losing even one piece of a pair can make the whole set useless. Studs slip under drawers, hoops bend, and dangling pieces tangle with chains until every pair needs its own spot to stay intact.
Time is the other cost. Rummaging through a messy box to match an outfit adds stress you do not need, especially with a large collection. An organizer that puts everything on display lets you choose in seconds instead of minutes.
The visual side matters too. Tangled or scattered jewelry makes a space look messy, while proper storage keeps things tidy and actually pleasant to look at. Your earrings are an expression of your style, so how you store them can double as wall art, whether that means rustic wood, bohemian fabric, or sleek modern mesh.
Store-bought organizers often run expensive and still lack the flexibility for your specific collection. The DIY route costs a fraction and builds exactly to your space and taste.
Materials That Work

Wood gives a project weight and a clean edge, but it is not forgiving if you change your mind later. Wire mesh, the kind sold in craft sheets or pulled from a memo board like the SÖDERGARN, lets earrings hang through the grid by their hooks and holds its shape under tension. Fabric softens the look and works best when stretched taut across a frame, though studs need a backing layer, something like poly foam or plastic canvas, to keep them from pushing through. Cork takes a pin directly, which means no tools beyond the earrings themselves, and a fabric cover dresses it up without losing the function.
Upcycled items, branches, old grater boxes, or scrap frames, carry the risk of uneven surfaces and mystery alloys that stain silver posts. The material you pick decides which earring types stay usable. Mesh and cork handle almost everything; bare wood and raw fabric need extra engineering for studs. My own leaning, after sorting through enough failed prototypes, is to match the material to the earring you own most of: hoops want open grids, studs want soft anchors, and anything in between wants a surface that does not fight back.
Making It Yours

The best part of building your own earring storage is that nobody else’s bedroom needs to look like yours. A cork board frame can sit raw and rustic or take on clean edges with a coat of paint, and the board itself can split into sections for studs, hoops, and the long posts that tangle together in drawers. Paint or stain a wooden jewelry box to match your dresser, line the compartments with velvet or felt, and suddenly the thing protecting your earrings also reads as deliberate decor.
I kept seeing the same tension in every project I read about: wall-mounted pieces want to be seen, while boxes and stands want to travel or hide. The IKEA memo board hack took ten minutes, and the person who made it already planned a second frame for studs because the first one filled up fast. That is the kind of adaptation a store-bought organizer rarely offers. Rotating stands, tree-shaped holders, multi-level trays with removable dividers, small hooks inside a box lid for chains or long earrings, even a monogram on velvet if you want it personal and Pottery Barn polished. Each version carries the same risk: overbuilding for the collection you have today and leaving no room for the pair you buy next month. Plan for the growth, not the current count.
Packing Earrings for Travel

A pill organizer from the pharmacy aisle became my most reliable travel fix after one too many mornings spent untangling hoops from necklace chains at hotel desks. Seven compartments, each with its own snap lid, hold one pair of studs or small drops without letting them migrate. The whole thing slides into a cosmetics pouch or even a jacket pocket.
For longer trips, a soft jewelry roll with padded slots and a tie closure beats rigid cases. It weighs next to nothing and conforms to whatever corner of your suitcase is left. The key is choosing one with individual pockets rather than open loops, since loops let posts poke through and scratch whatever they touch.
Ice cube trays work in a pinch for car or carry-on organization, one compartment per pair, though they lack lids and need a rubber band around the whole tray to keep contents from spilling. I have used one this way, but only for drives where the tray stays upright.
Hard-shell travel organizers with foam inserts or mesh pockets cost more and take up real space. They make sense for fine jewelry or for checking a bag, where the case itself needs protection. For carry-on travel, soft and light wins; the goal is keeping pairs separated and posts from bending, not armoring against a baggage handler.
Upcycling and Sustainability

The best upcycled earring storage starts with what you already own and where you’ve already been. A driftwood branch gathered on a family vacation carries more meaning than anything bought new, and the irregular surface gives each earring its own natural hook. Metal cheese graters, wire cooling racks, even vintage keys from a grandparent’s kitchen drawer work the same way: the holes and shapes built for another purpose become perfect display points once you clean them up and add a coat of paint in gold, copper, or whatever color matches your wall.
What convinced me, reading through the ideas that actually get built, is that the story behind the material matters as much as the function. A branch jewelry tree mounted in a vase looks rustic and costs nothing but the time to sand and seal it. A repainted kitchen rack framed and wall-mounted gives off industrial-vintage energy that no retail organizer replicates.
The sustainability angle is straightforward. Every piece you repurpose is one piece kept from landfill, and the result is almost always more original than store-bought options. The tradeoff is effort: cleaning driftwood, sanding branches, testing whether a grater’s holes fit your hook widths. For me, that labor is the point. The organizer becomes a conversation starter that happens to hold earrings, not the other way around.
Frequently Asked Questions
How do I organize my earrings?
Use a DIY holder matched to your collection type: picture frames with mesh or fabric for wall display, cork boards for easy pinning, ice cube trays for studs in drawers, or rotating carousels for large mixed collections. The right choice keeps every pair visible, separated, and reachable in seconds instead of buried and tangled.
What materials do I need for a DIY earring holder?
Common materials include wood for frames and stands, wire mesh or hardware cloth for open-grid hanging, cork board for direct pinning, fabric for soft backing and visual warmth, and upcycled items like old graters or picture frames. Match the material to your earring type: mesh and cork handle almost everything, while bare wood or raw fabric need extra backing for studs.
How can I prevent my earrings from tangling?
Give every pair its own spot with dedicated storage that keeps them separated and visible. Compartmentalized trays, individual hooks on mesh or pegboard, one pair per ice cube compartment, or curved teacups that wall off pairs by style all stop the knots before they start. The key is avoiding shared open spaces where hooks and chains can interweave.