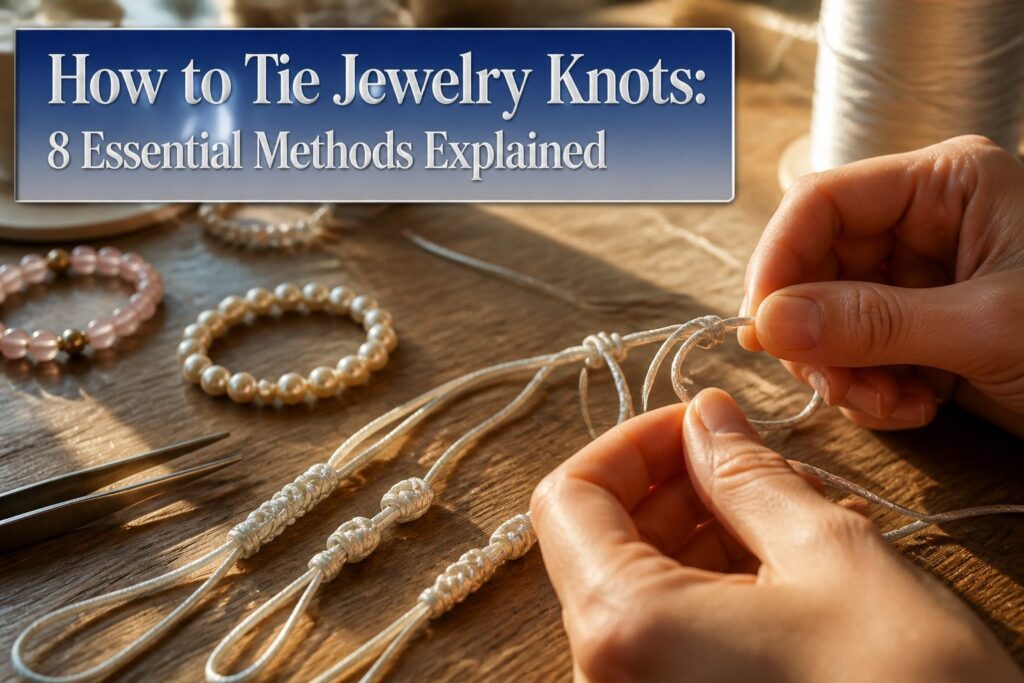
You can learn to tie every knot in this guide with nothing but cord and your fingers, plus a pair of tweezers for pearl work. The whole set takes maybe an afternoon of practice before your hands remember the motions.
Most beginners get the surgeon’s knot wrong by wrapping only once through the loop; the second pass is what locks an elastic bracelet against daily tugging, and skipping it means the knot rolls apart under tension.
That double wrap sits slightly wider than a square knot, which is why it throws off spacing in fine silk thread, but for 0.5–1 mm elastic cord it is the only closure I trust.
1. Overhand Knot
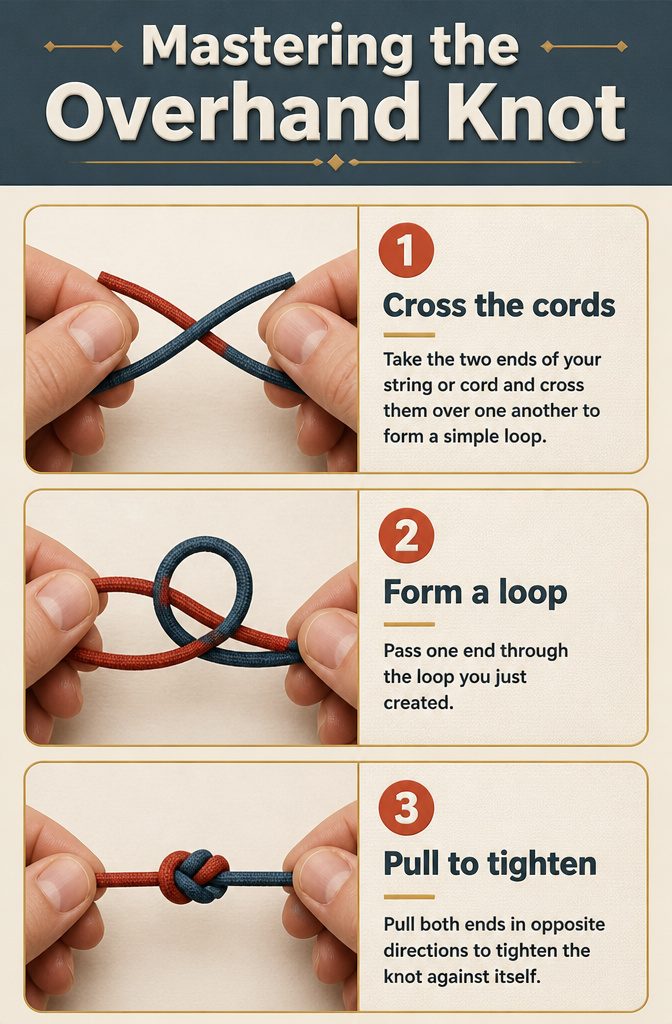
- Take the two ends of your string or cord and cross them over one another to form a simple loop.
- Pass one end through the loop you just created.
- Pull both ends in opposite directions to tighten the knot against itself.
The overhand knot is the foundation for several other knots in jewelry making, including the square knot and the surgeon’s knot.
I keep a scrap cord on my workbench tied in one of these so I can feel the structure before I start a project; the motion is the same one you use to begin tying a bow, so the muscle memory is already there.
What limits the overhand knot for finished work is that it jams tight under tension and can be difficult to undo without damaging softer fibers.
For temporary holds, test fits, and as the first step in more complex knots, though, it is the knot I reach for before any other.
2. Square Knot
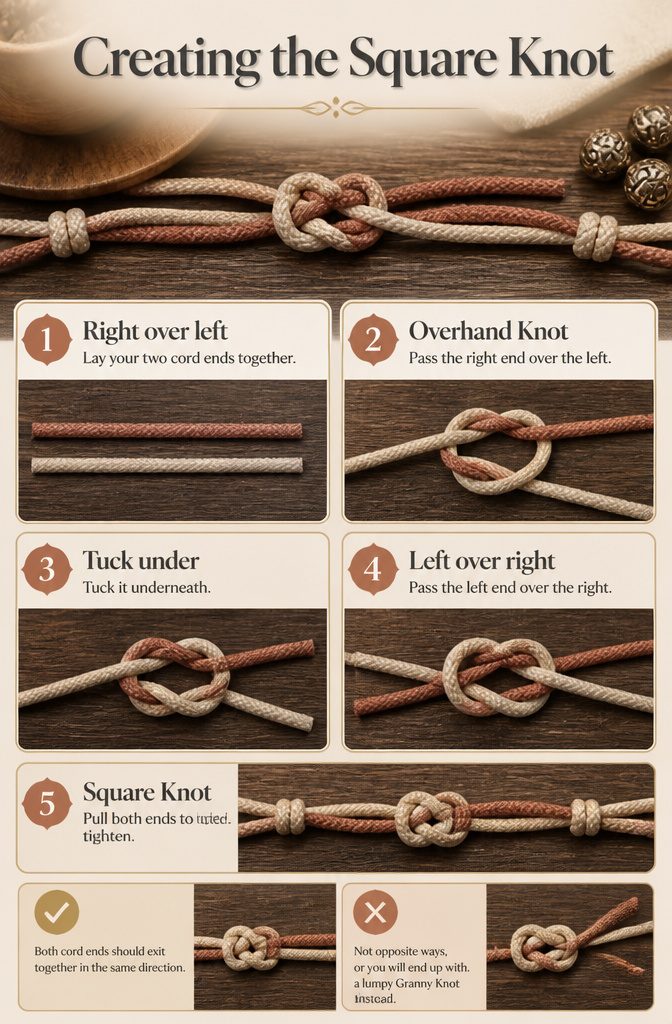
The Square Knot, also called a Reef Knot, earns its place in jewelry work for looks rather than strength.
Sailors originally tied it for sails and ship rigging, which is where the Reef name comes from, but strung beads or cord bracelets are where it shows up now.
- Start right over left. Lay your two cord ends together and tie a simple Overhand Knot, passing the right end over the left and tucking it underneath.
- Finish left over right. Tie a second Overhand Knot directly on top of the first, this time passing the left end over the right. Both cord ends should exit together in the same direction, not opposite ways, or you will end up with a lumpy Granny Knot instead.
"The Square Knot, also known as a Reef Knot, is a more fun and decorative knot. While it is a bit more tricky to grasp than the Overhand, once you have the hang of it, it becomes really easy to do."
That second direction swap is the whole trick. Get it right and the knot lies flat and symmetrical, which is exactly why it works as a clasp substitute or a decorative center point on a cord bracelet.
Get it wrong and the thing twists and loosens under tension. I check my exit direction every single time.
3. Surgeon’s Knot
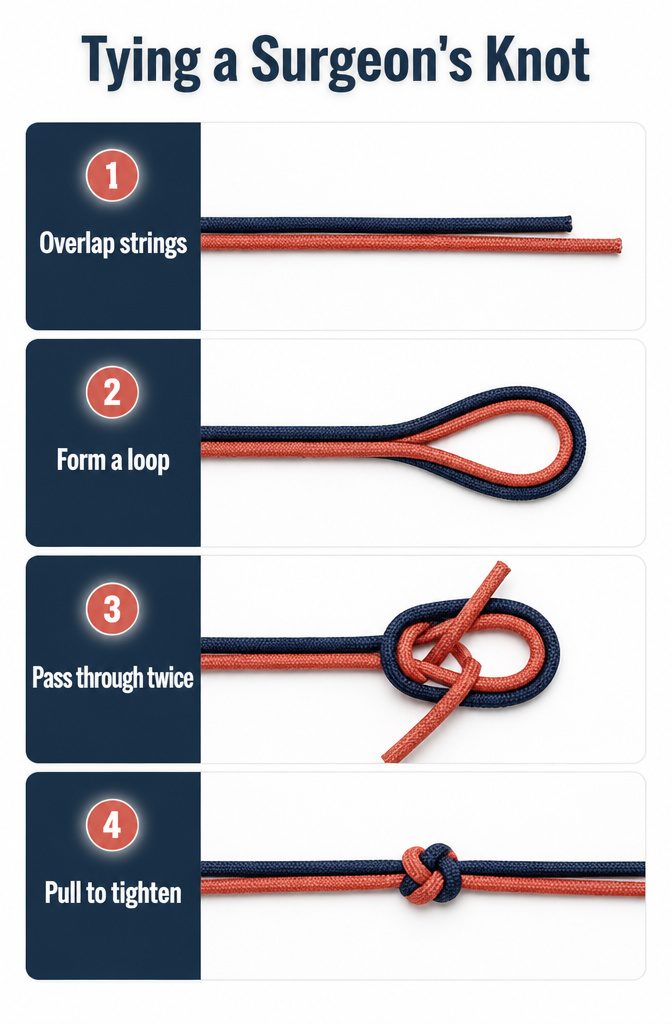
The Surgeon’s Knot earns its name from operating rooms, where a slipped knot is not an option. In jewelry, that same reliability matters for elastic cord bracelets or any piece that takes daily tugging.
- Overlap the ends of two strings by several inches, the same working length you’d leave for a Square Knot.
- Form a simple loop with the doubled section, treating both strands as one.
- Pass one end through that loop, then pass the same end through a second time before you tighten anything. The double wrap is the entire difference.
- Pull both ends firmly to seat the knot, then trim close and dab with clear glue if the cord is synthetic.
The finished knot spreads slightly wider than a Square Knot, but it will not capsize under tension.
A Square Knot can roll apart when one line seesaws against the other; the Surgeon’s second turn locks the structure. For stretch bracelets strung on 0.5–1 mm elastic, this is the knot I reach for every time.
It costs you bulk: in fine silk thread for pearl knotting, it throws off spacing, and a simple overhand or dedicated Pearl Knot wins instead.
4. Pretzel Knot
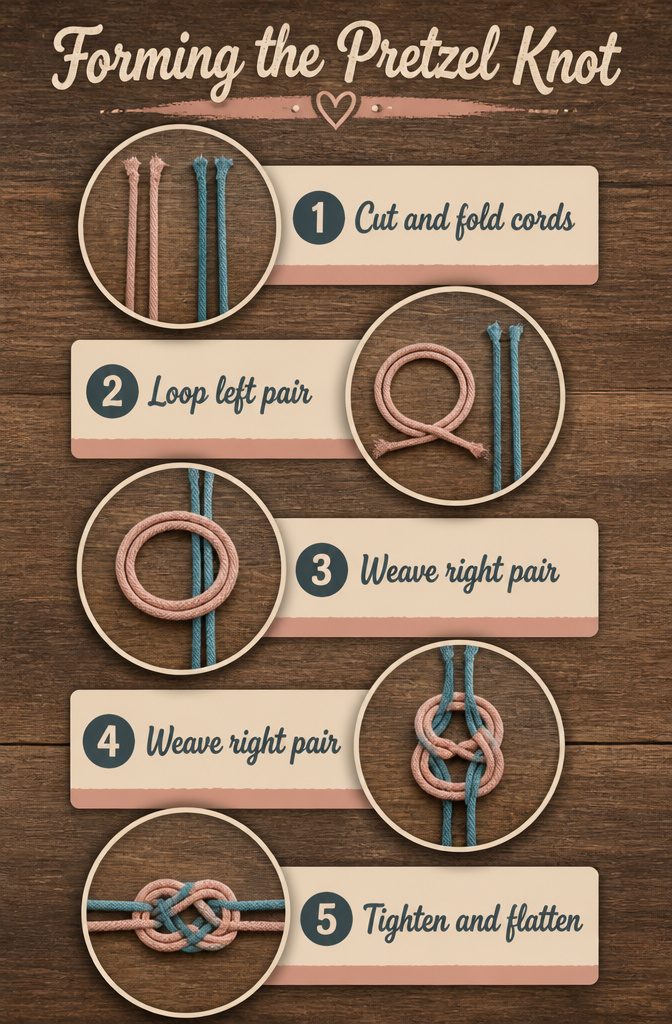
The Carrick Bend, better known in jewelry work as the pretzel knot, earns its keep almost entirely as decoration. The finished shape sits flat and symmetrical, with a woven center that looks more complicated than the tying actually is.
- Cut two cords and fold each in half so you have four ends. Lay the bundle flat and separate it into two pairs.
- Take the left pair and loop it around itself, letting the ends cross back over the left side so you have a loose circle.
- Lay that looped left pair over the right pair. Hold it in place with a finger.
- Lift the right pair upward, then weave it through the opening: over the first strand, under the next, over the third, under the fourth. You are threading through the pretzel shape as it forms.
- Exit the weave, then flatten the knot and pull both pairs outward slowly. Some strands will need nudging downward or sideways as you tighten so the knot stays symmetrical and does not twist into an uneven lump.
The pretzel knot works best where the knot itself is the focal point: a pendant center, a bracelet closure, or a pair of linked earrings.
It is not the strongest join for load-bearing strands, but for sheer neatness, few decorative knots match it.
5. Pearl Knot
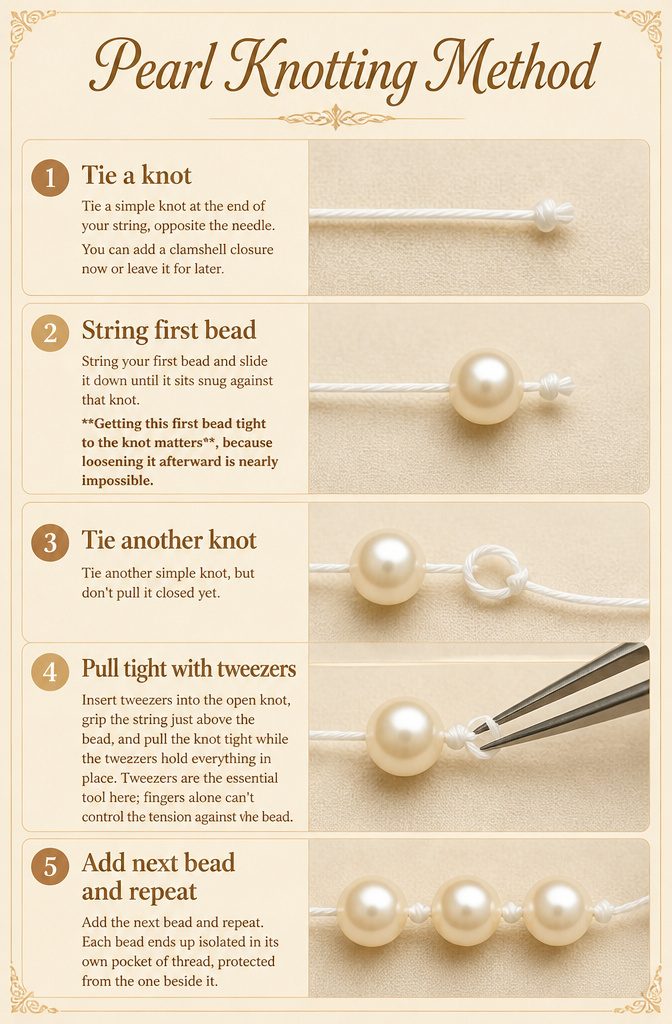
Pearl knotting keeps beads from knocking against each other, which is why it matters for any strand you plan to wear regularly. The knot acts as a cushion between each bead, so a hard bump doesn’t crack the surface.
- Tie a simple knot at the end of your string, opposite the needle. You can add a clamshell closure now or leave it for later.
- String your first bead and slide it down until it sits snug against that knot. Getting this first bead tight to the knot matters, because loosening it afterward is nearly impossible.
- Tie another simple knot, but don’t pull it closed yet.
- Insert tweezers into the open knot, grip the string just above the bead, and pull the knot tight while the tweezers hold everything in place. Tweezers are the essential tool here; fingers alone can’t control the tension against the bead.
- Add the next bead and repeat. Each bead ends up isolated in its own pocket of thread, protected from the one beside it.
6. Sliding Knot
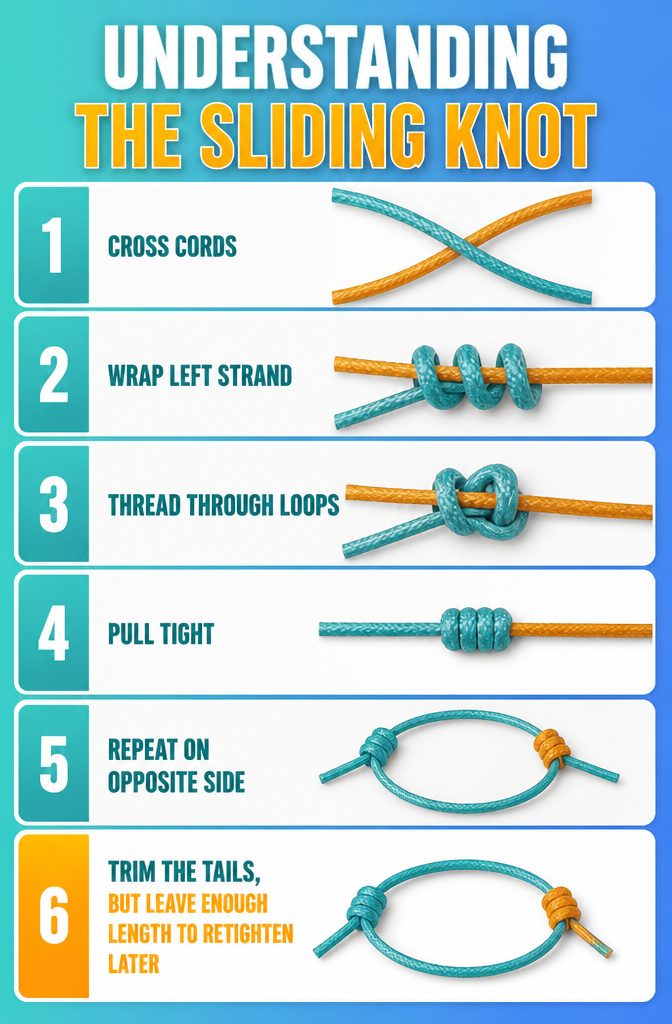
The sliding knot turns a single cord into an adjustable closure, which is why it still shows up on bracelets meant to fit anyone.
I reach for it when I want the wearer to dial the tightness up or down without a clasp in sight.
- Cross the two cord ends so the left strand sits in front of the right.
- Wrap the left strand around the right, looping it three times total.
- Thread the end of that left strand back through the loops you just formed, entering from the first loop and passing through the inside of all three.
- Pull tight to set the knot.
- Repeat the same sequence on the opposite side of the bracelet so both ends can slide against each other.
- Trim the tails, but leave enough length to retighten later if the cord settles.
This method works best with a thicker strand, something with enough body to hold friction.
Thin string will slip. The sliding knot was everywhere in the 90s on neon rope bracelets, and it still earns its place for any piece where the wrist size is a question mark.
7. Half-Hitch Knot
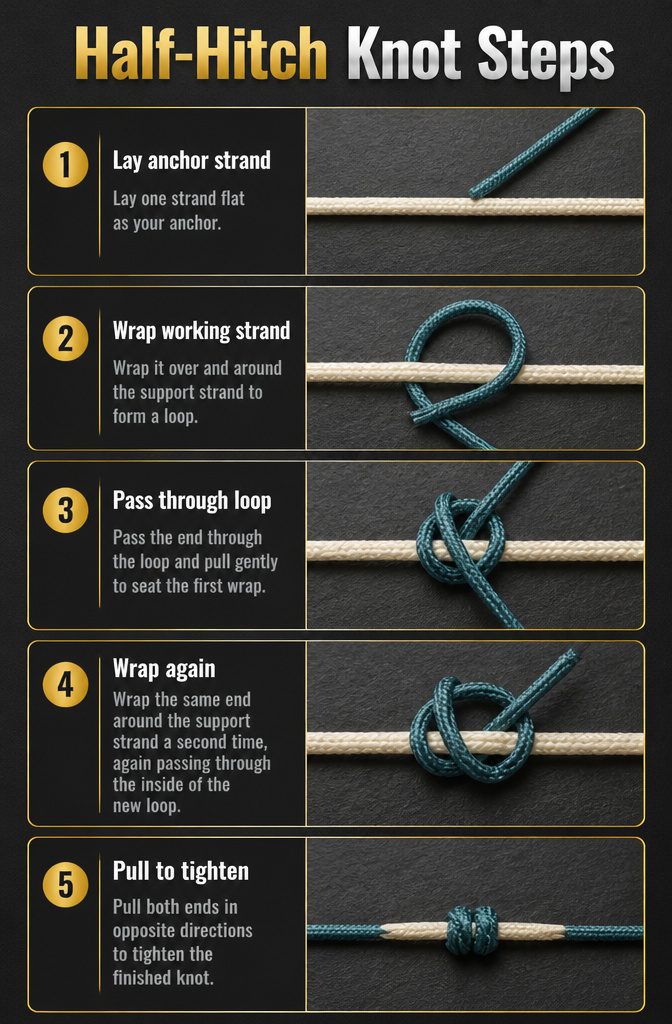
A Half-Hitch Knot takes the basic Overhand structure and wraps the working strand around the support strand twice instead of once, which gives you the extra security you need for heavier beads or bracelet cord that sees daily wear.
- Lay one strand flat as your anchor; this is the support strand that stays still.
- Take the second strand and wrap it over and around the support strand to form a loop.
- Pass the end of the working strand through that loop and pull gently to seat the first wrap.
- Wrap the same end around the support strand a second time, again passing through the inside of the new loop.
- Pull both ends in opposite directions to tighten the finished knot.
I reach for this over a plain Overhand when the piece will take tension, like a strung bracelet that gets pulled on over the hand, or when I want the knot to sit quietly under a crimp cover without slipping.
It costs you bulk: two wraps eat more cord length and sit slightly thicker against the skin, so for a delicate silk strand with tiny seed beads, the single Overhand still wins.
8. Lark’s Head Knot
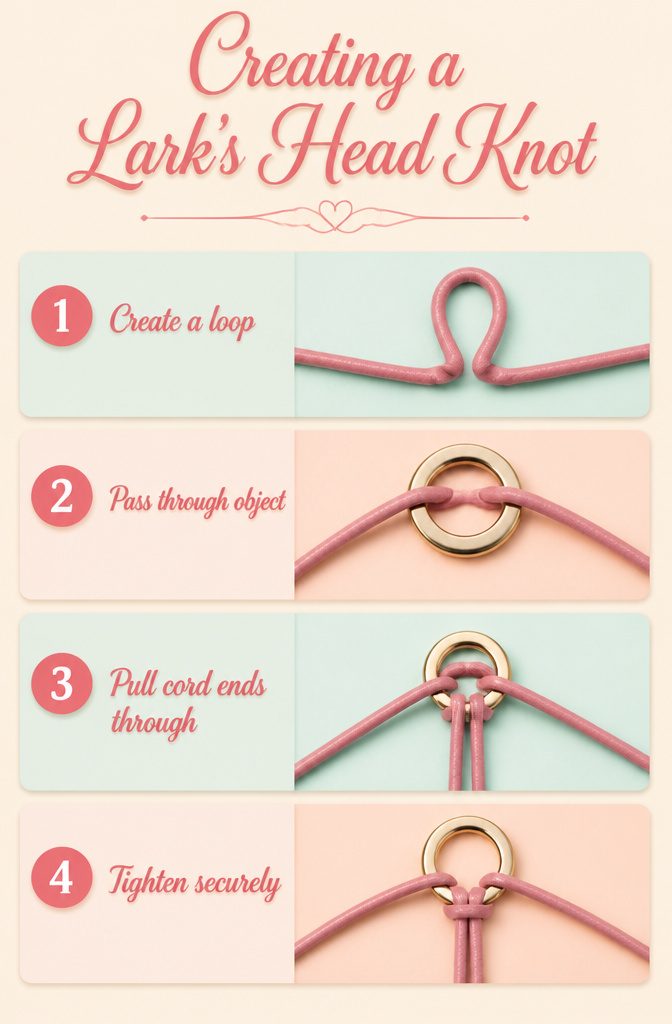
The lark’s head knot, also called a cow hitch, is a hitch in the true sense: it hitches cord or string to an object rather than joining two ends together.
I reach for this one first when I need to attach a pendant, a finding, or a ring to a cord without extra hardware.
- Create a loop in the middle of your cord and hold it ready.
- Pass that loop through the object you are attaching to. A washer, a ring, or a bail all work; round shapes sit cleanest.
- Pull the two cord ends through the loop you just made.
- Tighten, keeping the cord flat as you draw it up. Twisted cord here looks sloppy and weakens the hold.
The knot grips securely under tension and unties cleanly when you need it to.
I use it for pendant drops on leather cord and for hanging charms from chain links where a jump ring would add bulk I do not want.
Flat leather and round waxed cotton both behave well; ribbon and very soft cord can crush or twist, so I test the material first before committing to the full piece.
Tools and Materials
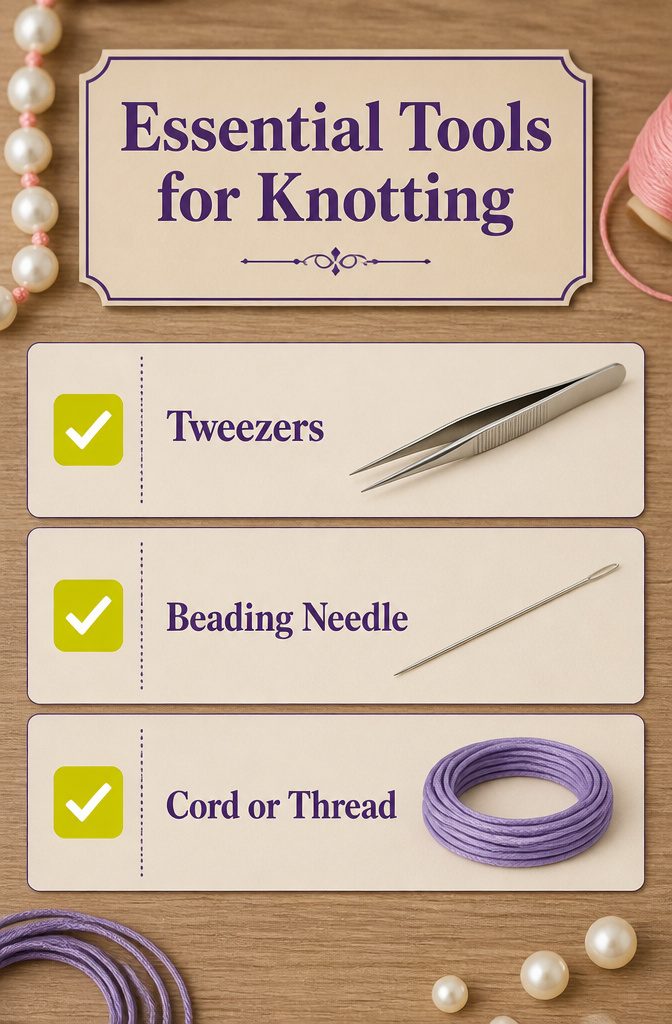
Most knots in this guide need nothing more than cord or thread and your own fingers.
The pearl knot is the exception, and it asks for two specific tools that make the difference between a tight, professional result and a mess of loose beads.
- Tweezers let you grip the working end of the thread while you pull the knot closed around a bead. Without them, the knot tightens in the wrong place and the bead sits loose, which defeats the whole purpose of a protective knot.
- A beading needle carries the thread through beads with small holes, especially pearls. Regular sewing needles often won’t fit, and forcing them risks chipping the surface.
- Every other method here, the overhand, square, surgeon’s, pretzel, sliding, half-hitch, and lark’s head, work with cord alone. No needle, no tweezers, no extra purchase.
If you already own basic jewelry pliers for wire work, they do not substitute for tweezers here. The fine tip and light pressure of tweezers matter; chain-nose pliers are too bulky and can crush a soft pearl while you work.
Knotting Techniques Overview
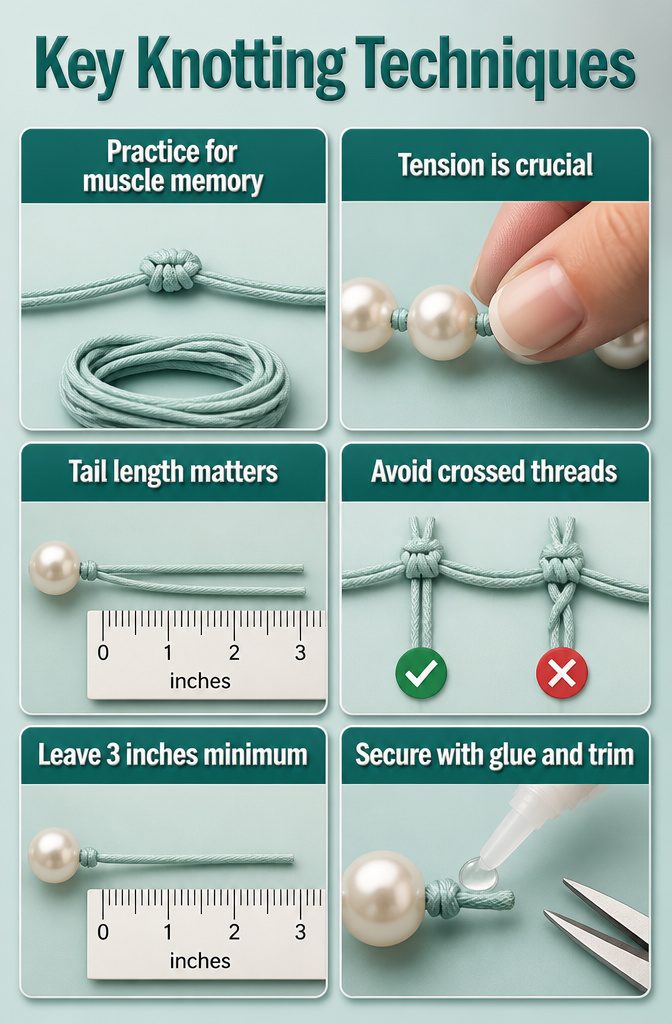
Practice separates a knot that holds from one that slips loose an hour later.
I keep a scrap of cord on my desk and run through new knots ten or fifteen times before I touch any actual beads. The muscle memory builds faster than you expect, and it costs nothing but a few minutes.
Tension is the first principle. Pull too hard and silk frays or beads crack; too soft and gaps open between pearls that should sit shoulder to shoulder.
I aim for the same tightness you’d use wringing out a damp towel, then check by pressing a fingernail between two beads. It should resist slightly, not pinch.
Tail length matters more than beginners think.
Anything under 2 inches risks pulling through, especially with slippery nylon or coated cord. I leave 3 inches minimum, trim after the adhesive sets, and never trust a freshly tied knot until the end has been dabbed with jeweler’s glue and tucked.
Crossed threads are the error I catch most often in my own work.
One strand loops over another inside the knot instead of running parallel, and the whole structure weakens from the inside. Rotating the piece slowly while tightening lets you spot the twist before it buries itself.
Decorative Versus Functional Knots
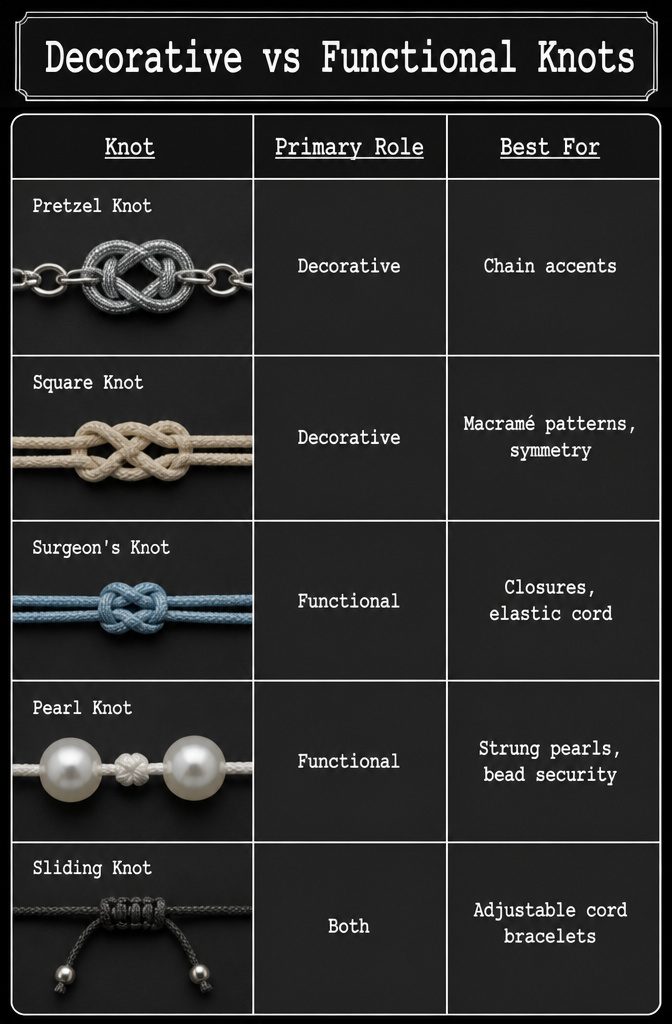
Some knots earn their place by looking intricate, while others hold a piece together through years of wear.
The Pretzel Knot and Square Knot fall squarely in the decorative camp: they add texture to a chain or cord but offer little holding power on their own.
The Surgeon’s Knot, borrowed from medical suturing where it seals open wounds, and the Pearl Knot, which cushions each bead against the next with a tight stopper between them, are built for security.
The Sliding Knot is the rare crossover, letting you adjust a bracelet’s fit while still bearing real load.
| Knot | Primary Role | Best For |
|---|---|---|
| Pretzel Knot | Decorative | Chain accents, focal points |
| Square Knot | Decorative | Macramé patterns, symmetry |
| Surgeon’s Knot | Functional | Closures, elastic cord |
| Pearl Knot | Functional | Strung pearls, bead security |
| Sliding Knot | Both | Adjustable cord bracelets |
For a piece that moves with you, I reach for the Surgeon’s Knot: overlap the cord ends, form a loop, pass both ends through twice, and pull tight.
The double pass is what keeps it from slipping. For display-only elements, the Pretzel Knot wins on looks but needs glue or a secondary knot behind it to stay put.
The Sliding Knot saves you from sizing guesswork, though friction wear means it suits temporary or adjustable pieces better than permanent heirloom construction.
Frequently Asked Questions
What is the best knot for jewelry making?
There is no single best knot; the right choice depends on the job.
The overhand knot is the fastest for temporary holds, the surgeon’s knot locks elastic cord bracelets tight, and the pearl knot cushions beads against each other. Pick by function, not reputation.
How do you tie a pearl knot?
String a bead, tie a simple knot around the thread but do not pull it closed yet.
Slip tweezers into the open loop, grip the thread just above the bead, and tighten while the tweezers hold the knot in place. Each bead ends up isolated in its own thread pocket so hard bumps do not crack it.
What is a sliding knot?
A sliding knot is an adjustable closure made by wrapping one cord end around the other three times, then threading the end back through those loops.
Repeat on the opposite side so both ends can slide against each other to tighten or loosen the fit. It works best with thicker cord that holds friction; thin string slips.
How to tie a good knot on a ring?
The lark’s head knot attaches cord to a ring or bail cleanly. Fold your cord in half to make a loop, pass the loop through the ring, then pull the two cord ends through that loop and tighten.
It grips under tension and unties when you need it to, with no extra hardware adding bulk.
How to tie a surgical knot for jewelry making?
Overlap the cord ends by several inches, form a simple loop with the doubled section, then pass one end through that loop twice before tightening.
The double wrap is the entire difference from a square knot; it locks the structure so the knot cannot roll apart under tension. Trim close and add a dab of clear glue on synthetic cord.
How to tie a necklace knot with fishing line?
For thin, slippery monofilament, the half-hitch knot offers more security than a plain overhand because it wraps the working strand around the support strand twice instead of once, giving extra grip against slippage.





