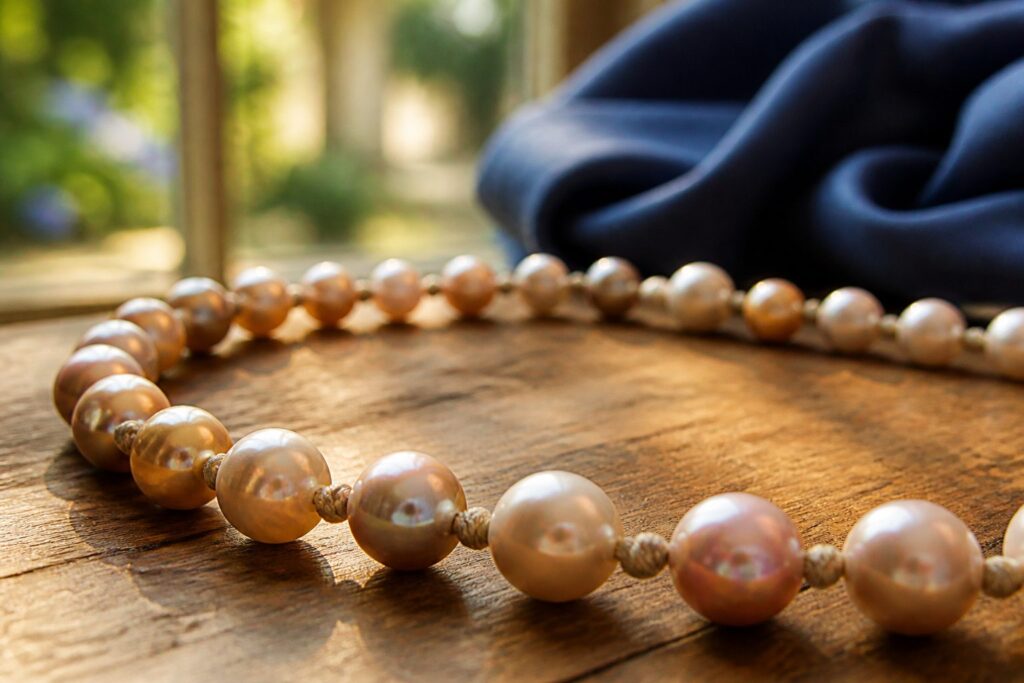
Beaded jewelry knots are overhand knots tied between individual beads on a silk or nylon cord, each one seated flush against the bead face with a beading awl so no thread shows through.
The method only works if you match the cord size to your bead hole diameter, a size 5 or 6 silk fits most pearls, but a knot that slips back through means you guessed wrong.
A double knot one inch from the end, hardened with glue, anchors the whole strand so the first bead never slides over.
What You Need
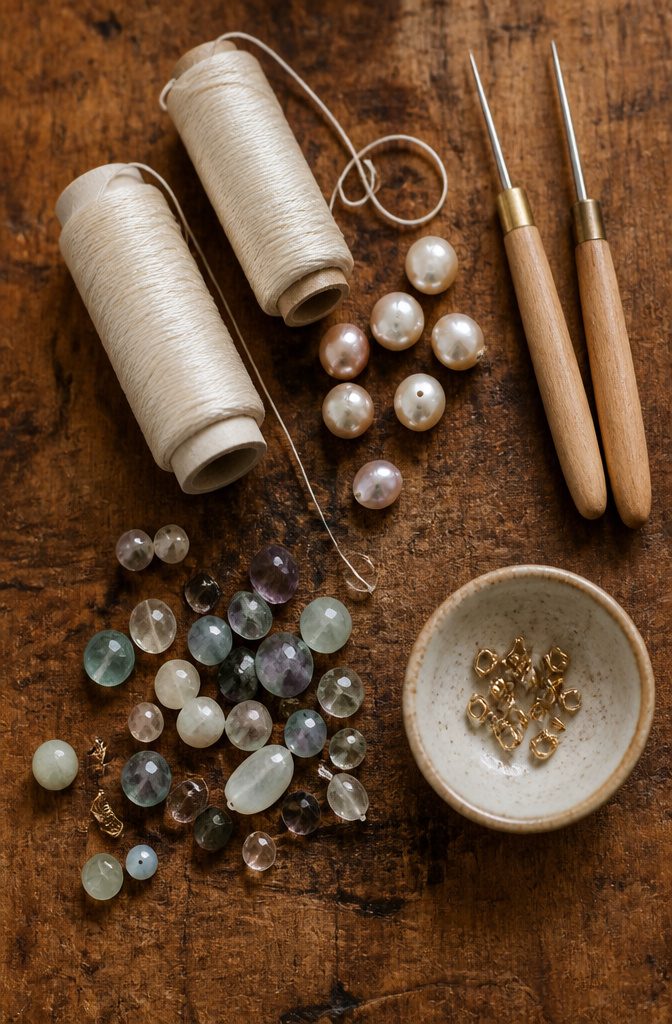
Silk knotting cord in size 5 or 6 is the place to start for most pearls, though the cord size you actually need depends on your bead hole diameter, not the bead itself.
Thread a sample through one hole before you commit; a knot tied at the end should hold the bead without slipping back through, and if it does not, step up or down accordingly.
A beading awl matters more than beginners expect. It is the tool that pushes each knot flush against the bead face, and without it you will have gaps you cannot close with finger tension alone.
For finishing, wire guards or knot covers tidy the ends, though some projects skip them for simplicity.
If you are adding a clasp, you may need to enlarge the holes of a few beads with a reamer so the doubled cord can pass back through.
Stretch your silk before you start to remove kinks; the extra minute saves loose, uneven knots later.
Single-hole pearls, gemstones, and Czech glass all work with this method. Match the cord color to the bead, since silk is thin enough that a clashing tone shows between knots.
Starting the Cord
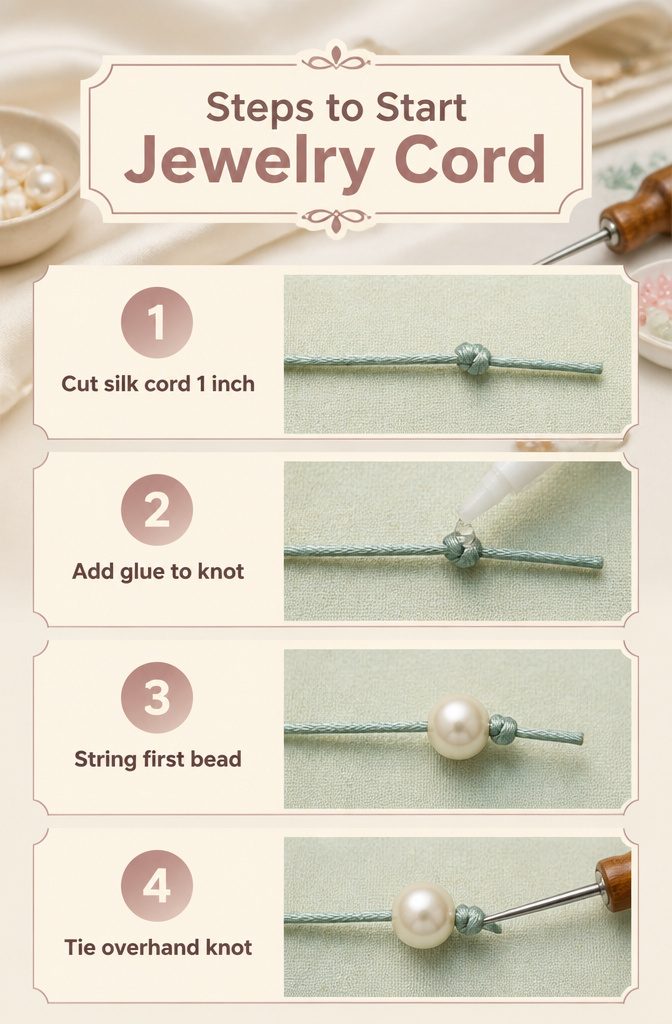
- Cut a length of silk cord and tie a double knot 1 inch from one end. This distance leaves just enough tail to grip while you work, but not so much that it tangles under your fingers.
- Add a small drop of glue to the knot and let it dry. The glue hardens the silk into a stopper slightly wider than the bead hole, which keeps your first bead from sliding over during the rest of the knotting process.
- String your first bead and push it down against the glued knot. The knot now acts as a fixed anchor point; everything after this builds outward from that spot.
- Tie an overhand knot right next to the bead and tighten it down with a beading awl. The awl lets you snug the silk flush against the bead face without leaving a visible gap, which is what separates finished-looking knotting from loose amateur work.
Knotting After Each Bead
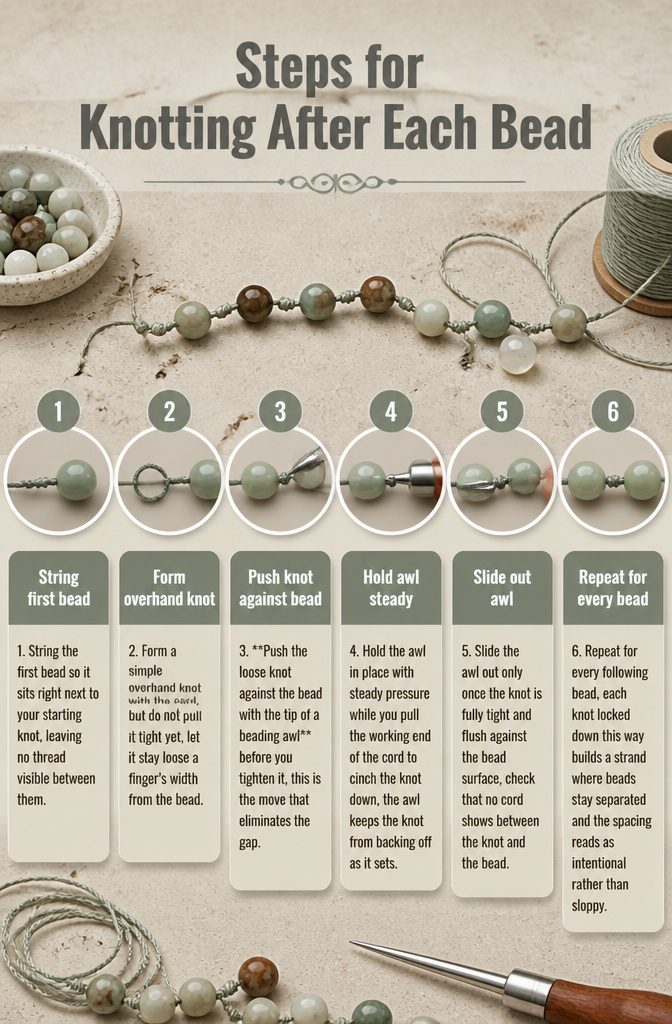
- String the first bead so it sits right next to your starting knot, leaving no thread visible between them.
- Form a simple overhand knot with the cord, but do not pull it tight yet, let it stay loose a finger’s width from the bead.
- Push the loose knot against the bead with the tip of a beading awl before you tighten it, this is the move that eliminates the gap.
- Hold the awl in place with steady pressure while you pull the working end of the cord to cinch the knot down, the awl keeps the knot from backing off as it sets.
- Slide the awl out only once the knot is fully tight and flush against the bead surface, check that no cord shows between the knot and the bead.
- Repeat for every following bead, each knot locked down this way builds a strand where beads stay separated and the spacing reads as intentional rather than sloppy.
Building the Strand
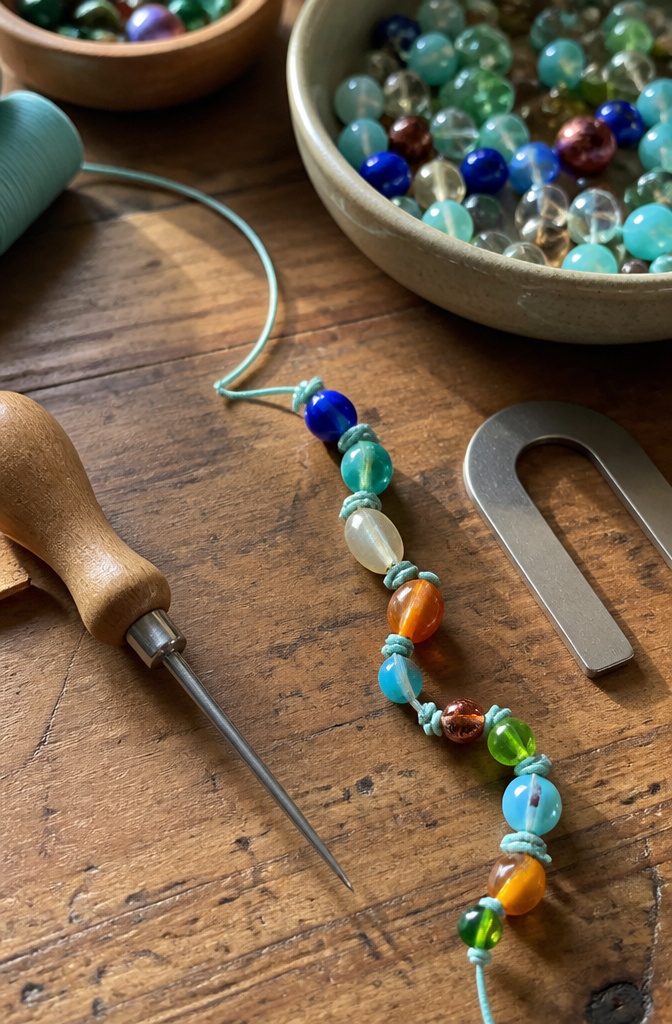
Once the first knot sits snug against the starting bead, the strand builds itself one unit at a time.
Slide the next bead up the silk, form an overhand knot, and cinch it down with an awl pressed against the cord just behind the bead.
The awl does two jobs: it keeps the knot tight to the bead face so no slack develops, and it gives the loop a consistent size so the spacing reads as intentional rather than accidental.
I press, lift, and pull in the same rhythm every time; any hesitation and the silk relaxes, leaving a gap that throws off the whole line.
Four full necklaces is the usual threshold before the tension stays uniform start to finish. The first one loosens in spots and collects a double knot or two.
The second is cleaner, and by the third the errors are isolated to a single slack bead. String on a reamed bead, knot, repeat sounds mechanical, but the hand learns to feel when the cord grips rather than slips.
For spacing that matches exactly, I keep a 0.5 inch or 0.75 inch spacer at my bench, dropping it over the silk before each knot so every gap stays uniform, stacking both for a 1.25 inch version when the design calls for it.
Without spacers, the eye picks up variation faster than you’d think, especially under office light where the strand hangs straight and the pattern has nowhere to hide.
Finishing With a Clasp
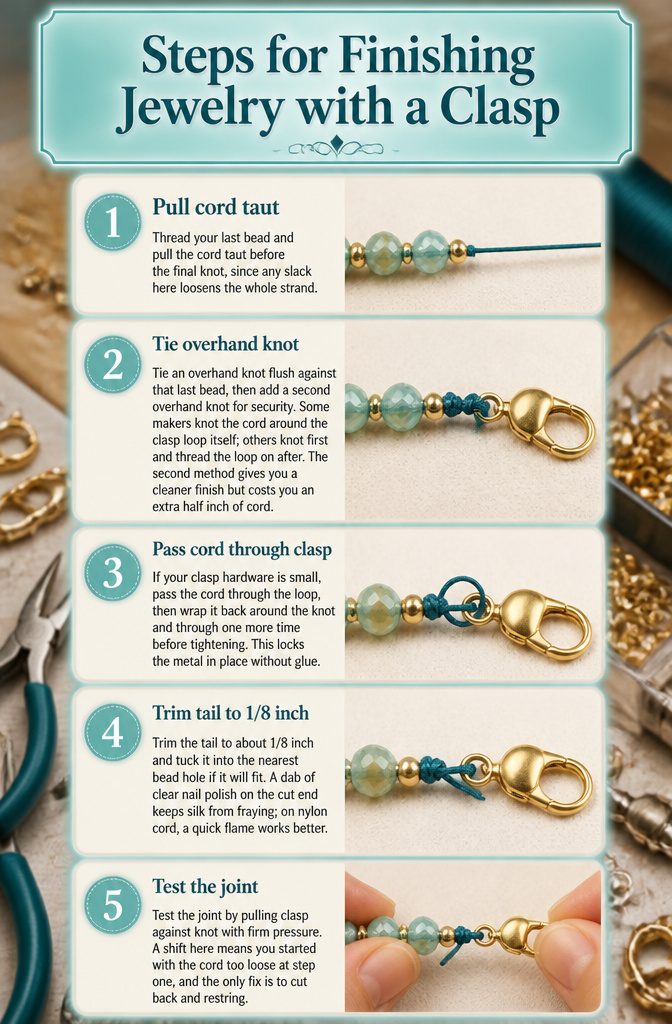
- Thread your last bead and pull the cord taut before the final knot, since any slack here loosens the whole strand.
- Tie an overhand knot flush against that last bead, then add a second overhand knot for security. Some makers knot the cord around the clasp loop itself; others knot first and thread the loop on after. The second method gives you a cleaner finish but costs you an extra half inch of cord.
- If your clasp hardware is small, pass the cord through the loop, then wrap it back around the knot and through one more time before tightening. This locks the metal in place without glue.
- Trim the tail to about 1/8 inch and tuck it into the nearest bead hole if it will fit. A dab of clear nail polish on the cut end keeps silk from fraying; on nylon cord, a quick flame works better.
- Test the joint by pulling clasp against knot with firm pressure. A shift here means you started with the cord too loose at step one, and the only fix is to cut back and restring.
The Overhand Knot
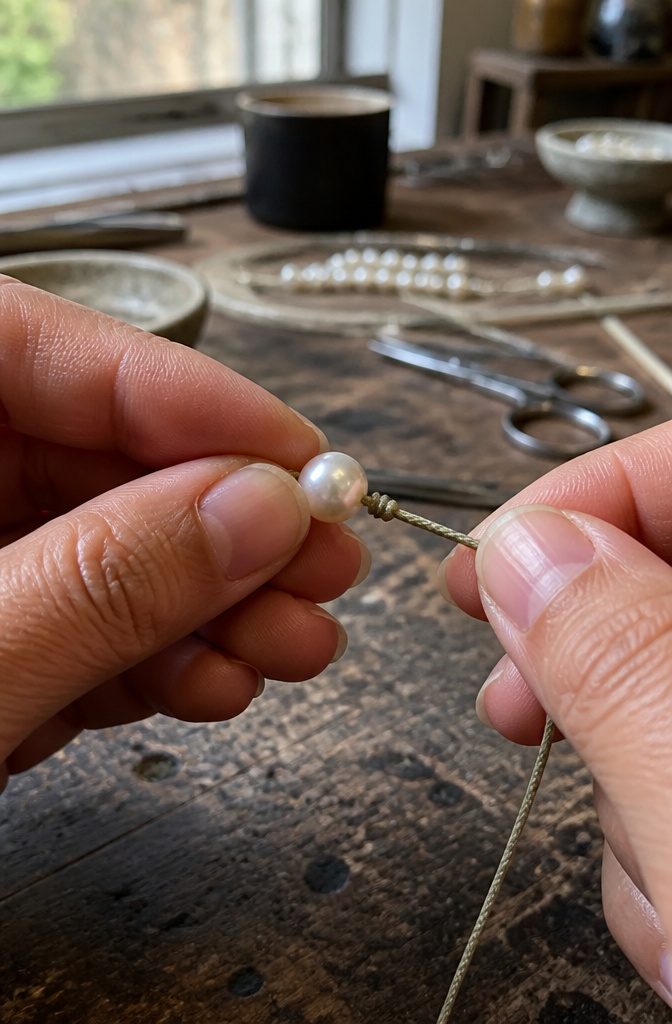
The overhand knot sits at the center of beaded jewelry knots because it does three things at once: it locks a bead in place, lies flat enough to disappear, and tightens flush with the surface when you press it with an awl.
Other knots bulk up or slip until you add extra turns, which wastes cord and stiffens the strand.
A square knot needs two cords to work. A surgeon’s knot grips well but leaves a bump that beads won’t slide past.
The overhand uses a single cord, one motion, and the finished knot can be nudged right against the bead hole with nothing more than a tapered tool.
For silk or nylon thread strung with pearls or gemstones, that flush finish means the beads sit at their proper spacing without gaps catching on skin or fabric.
Speed matters too. Once the motion becomes automatic, you can knot between beads at a pace that keeps a long strand from turning tedious.
The trade-off is minimal: the overhand won’t hold on slick elastic, and it can loosen if you forget to seat it tight before moving on. On standard cord, though, it wins for security per effort spent.
The Double Knot
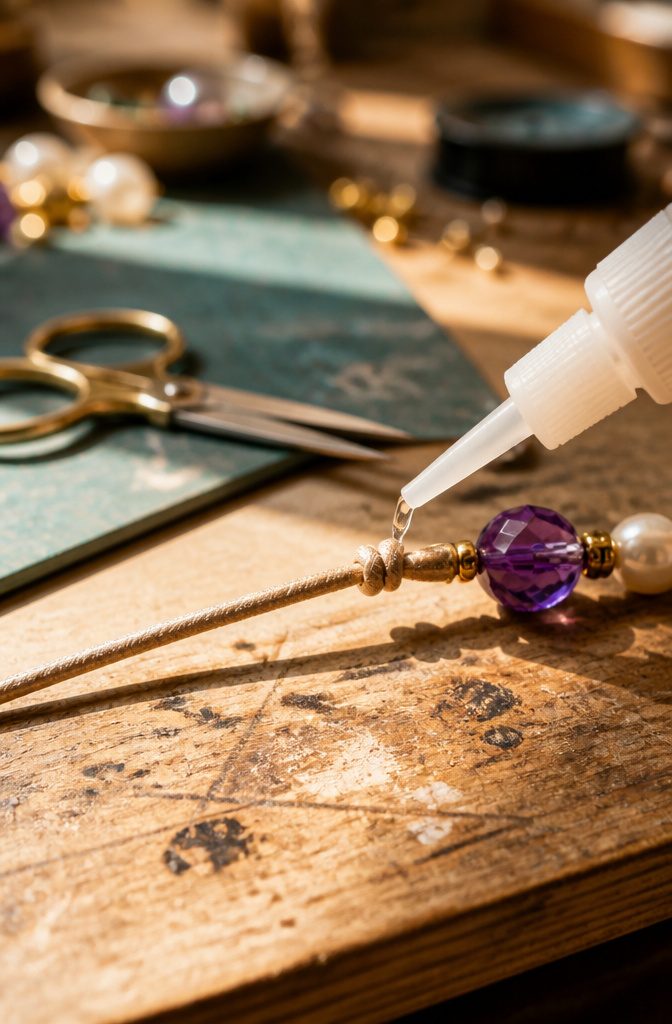
The double knot earns its place as the anchor point at the start of almost every knotted strand.
Tied one inch from the cord end with a small drop of glue worked in, it creates a stopper that will not pull through the first bead even under the tension of later knots.
That same construction appears again when finishing an elastic bracelet, where two ordinary knots stacked and cinched very tightly replace the clasp entirely.
A single overhand knot can slip or compact under stress, especially with silk cord that has been conditioned or with elastic that wants to rebound.
The double knot adds friction surface and distributes load across two overlapping coils rather than one.
I use the single form only when the cord itself is bulky or the bead hole is so tight that a double knot would refuse to seat flush.
For pearl knotting on silk, for gemstone strands, for any piece that will be worn and moved in, the double knot is the baseline.
The cost is bulk: in the finest cords and the smallest holes, you may need to test whether two knots stack acceptably or whether one well-glued single knot is the wiser risk.
The Pearl Knot
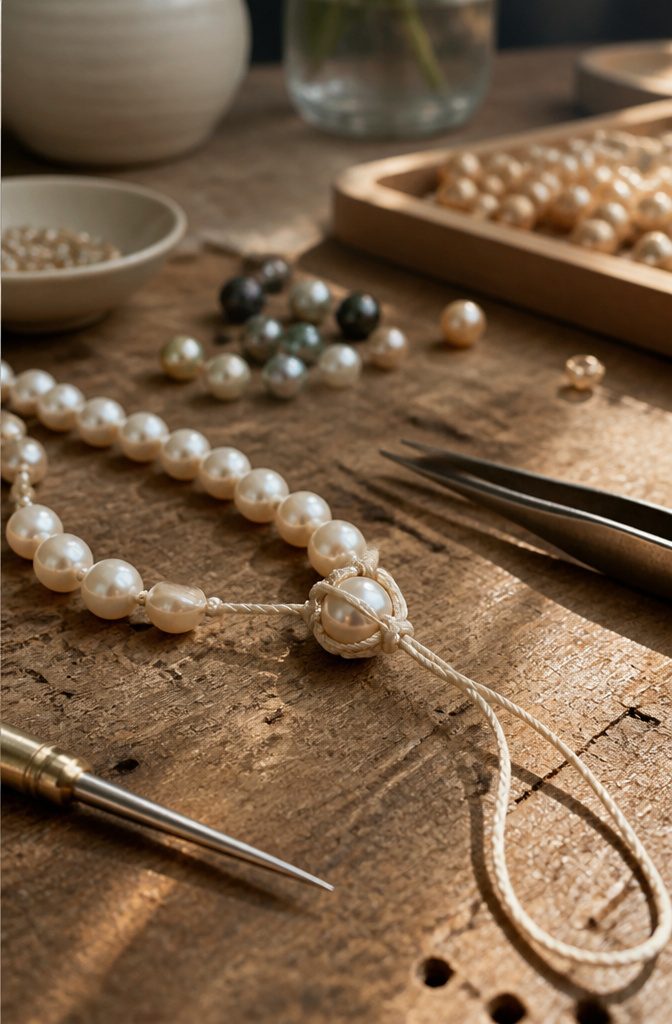
The pearl knot sits between each bead on a silk strand as a small, tidy cushion rather than a tight cinch.
Unlike a standard overhand knot, which pulls flat and hard against the hole, this variation leaves a soft, rounded bump that keeps pearls from rubbing and stops them from scattering if the cord breaks.
Silk cord in size 5 or 6 is what most pearl stringers reach for first. The knot has to be large enough that it won’t slip back through the bead hole, but not so bulky that it distorts the strand’s drape.
That sizing tradeoff, between security and flow, is why the pearl knot earns its own name instead of being filed under generic knotting.
A standard overhand knot tightens wherever you place it, which works for anchoring a clasp or finishing a cord but does nothing for spacing.
The pearl knot, tied with a needle and tweezers or a specialized tool, lands in the same spot every time and holds its shape.
Four necklaces in, the spacing starts to look automatic; before that, expect a few doubled knots and loose beads where tension wandered.
Knots for Elastic Cord
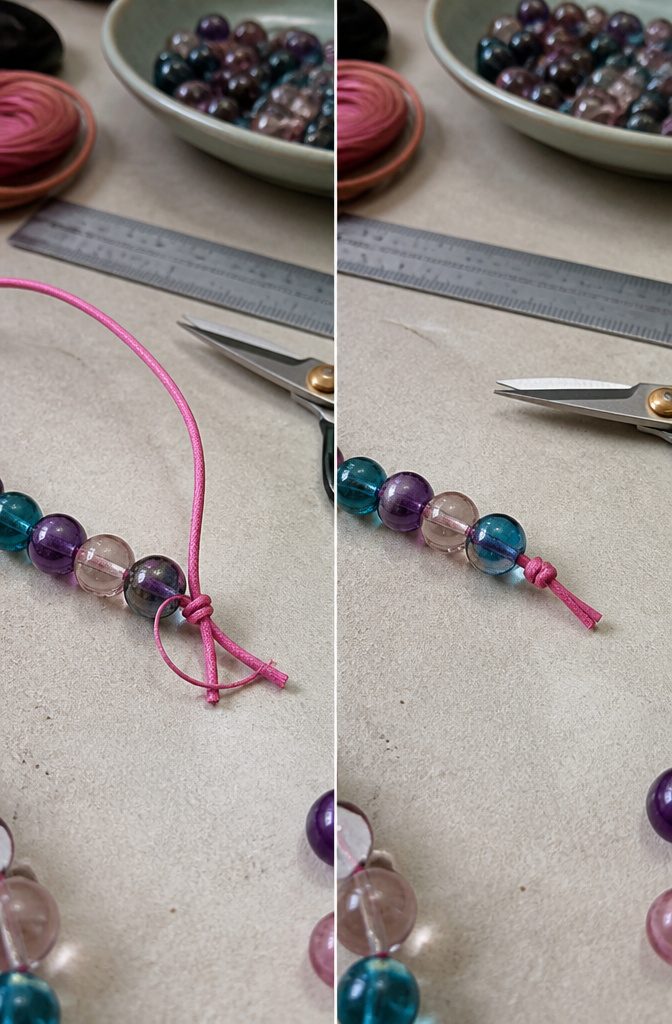
Elastic cord behaves nothing like silk, and the knotting has to match. Silk knots sit snug beside each bead and hold through friction; stretch cord rebounds, so a single wrap slips under tension.
The method that works is a double-wrapped double knot. Thread the beads, check the length against the wrist, then wrap the elastic cord around itself twice before tying the first knot.
Follow with a second ordinary knot directly on top, and pull both until the cord bites into itself. The doubled surface grips the stretch, and the second knot locks the first before the elastic relaxes.
Without that second knot, the first loosens within an hour of wear.
Pull hard, even harder than feels right; the cord tolerates it, and a half-tight knot is the reason stretch bracelets end up on the floor of a parking lot.
No glue or crimp covers the failure here, just the knot, so the knot has to be the whole security system.
Knots With Spacers
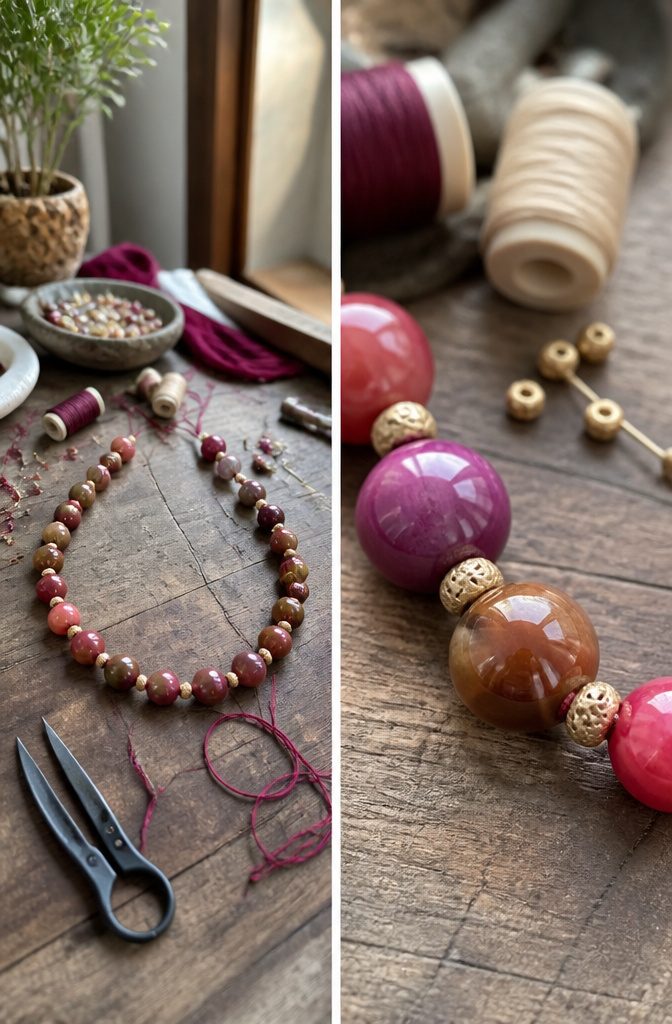
Knot-a-Bead Spacers give a tin-cup necklace its rhythm. The two-pack ships with a .5 inch and a .75 inch foam-and-metal spacer, and pressing either against the bead before you knot locks the gap at that exact width.
I stack both for a 1.25 inch span when the strand needs more air between pearls.
The tool itself still does the knotting; the spacer only sets the stage. Slip it over the silk, snug it to the last bead, tie the knot with the Knot-a-Bead, then slide the spacer out.
Repeat, and the spacing stays identical down the whole strand. Without a spacer, eyeballing the gap turns into a slow game of "close enough" that rarely is.
This matters most when the design itself is the negative space. A tin-cup necklace reads as deliberate because the gaps are uniform; uneven spacing just looks like a mistake in stringing.
The spacers also keep the knot from cinching too tight against the bead, which helps the silk wear longer. Standard knotting technique does not change, only the distance between each stop gets controlled.
Matching Cord to Bead Holes
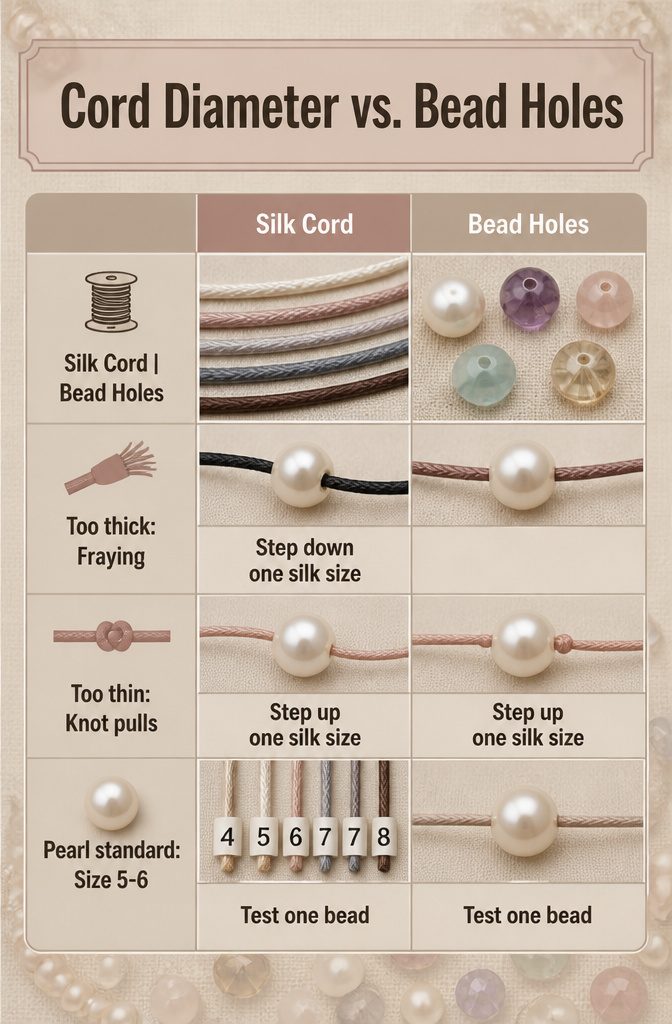
Silk cord diameter has to clear the bead hole with just enough room to pass through twice, since the knot itself sits inside the hole on a properly strung pearl or gemstone.
Size 5 or 6 silk is the standard match for cultured pearls, which tend to run tighter than drilled stones.
Thicker cord frays at the hole edge and refuses to seat flush, leaving beads to wobble on a bulge of fiber rather than settling knot-to-knot.
Too thin, and the knot slips through entirely or compresses to nothing under tension, so the strand loosens and gaps open with wear.
| Cord issue | What goes wrong | Fix |
|---|---|---|
| Too thick | Fraying, bead sits crooked, knot won’t hide | Step down one silk size |
| Too thin | Knot pulls through hole, strand loosens over time | Step up one silk size, or double-knot |
| Pearl standard | Size 5–6 silk fits most 0.5 mm holes | Test with one bead before cutting full length |
I keep a card of size 4 through 8 silk and test-knot through a sample bead before I commit. The five seconds saves restringing a whole necklace.
How the Knots Compare
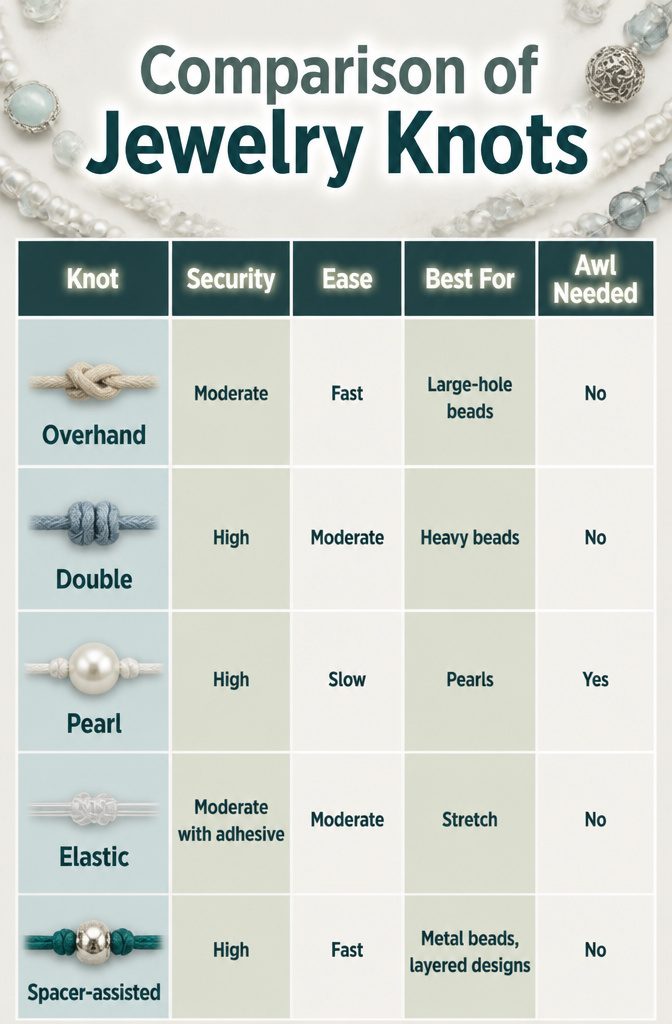
Not every knot earns its place on a strand. The overhand knots fastest and holds well on larger beads, but it can slip through small holes and sits proud, which matters if you want a clean line.
A double knot buys security for heavy stones or metal beads; it takes extra cord and bulks the strand, yet that bulk anchors weight that would pull a single knot loose.
Pearl knotting, done with silk and an awl, separates each bead so they never collide; the tool is non-negotiable, and the technique takes practice, but the finished drape is why fine jewelers still reach for it.
Elastic demands its own method: a surgeon’s knot or doubled square knot, pulled tight and dotted with adhesive, because stretch cord under tension will walk out of any standard stopper.
Spacer-assisted knots split the difference; a metal or silicone bead grips the cord and lets you cinch hard without fighting slippery material, though the spacer itself becomes part of the design.
| Knot | Security | Ease | Best For | Awl Needed |
|---|---|---|---|---|
| Overhand | Moderate | Fast | Large-hole beads, casual wear | No |
| Double | High | Moderate | Heavy beads, daily wear | No |
| Pearl | High | Slow | Pearls, fine gemstones | Yes |
| Elastic | Moderate with adhesive | Moderate | Stretch bracelets | No |
| Spacer-assisted | High | Fast | Metal beads, layered designs | No |
I default to a double knot for bracelets that see a hand-washing habit and reach for spacers only when the bead holes are polished metal and slick.
Pearl knotting I reserve for silk and pieces I want to last decades; the awl stays on that bench, not every project.
What Changes the Difficulty
Bead hole size consistency changes everything. A set of pearls with slightly uneven holes forces constant adjustments in silk thickness and knot tightness, while uniform holes let you settle into rhythm.
The cord matters just as much: stiff silk holds shape while you work but resists sliding tight against a bead, and limp cord knots easily yet tangles in loose loops before you set it.
Heavier beads pull slack into the strand between knots unless you brace each one against the last with tension against your work surface.
Four necklaces is the practice threshold that turns scattered technique into reliable results.
The first will show loose knots, skipped knots, and doubled knots where fingers guessed wrong. The second cleans up most of that.
By the third, only a bead or two sits loose. The fourth comes out even, and the difference is muscle memory for tension and spacing, not book learning.
A flat surface with the strand running toward you, not dangling, keeps gravity from opening gaps. Slow, steady pulls seat each knot; rushing collapses the work into uneven spacing no clasp can save.
Frequently Asked Questions
What is the best knot for beaded jewelry?
The overhand knot is the best choice for most beaded jewelry knots because it locks beads in place, lies flat, and tightens flush against the bead face when pressed with an awl.
It uses a single cord and one motion, making it faster than alternatives like the square knot or surgeon’s knot. Other knots either need two cords, leave bumps beads won’t slide past, or waste cord with extra turns.
What supplies do I need for knotting beads?
You need silk knotting cord in size 5 or 6 for most pearls, a beading awl to push knots flush against beads, and wire guards or knot covers for finishing.
Match the cord color to your beads since thin silk can show contrasting tones between knots. A reamer helps enlarge bead holes if you are adding a clasp that needs doubled cord to pass through.
How do you tie a knot in elastic beading cord?
Double-wrap the elastic cord around itself before tying the first knot, then follow with a second ordinary knot directly on top and pull both until the cord bites into itself.
Pull harder than feels right; the cord tolerates it, and a half-tight knot is why stretch bracelets fail. No glue covers the failure here, so the knot itself must be the whole security system.
How to tie a bead into a bracelet?
Thread the bead onto your cord, form an overhand knot, and cinch it flush against the bead using a beading awl to eliminate any gap.
Hold the awl in place with steady pressure while you pull the working end tight, then slide the awl out only once the knot is fully set.
Repeat for each bead, building the strand one unit at a time with consistent tension.
How to do a slip knot for jewelry?
A slip knot would not provide the secure stopper needed to anchor beads against movement and wear.





