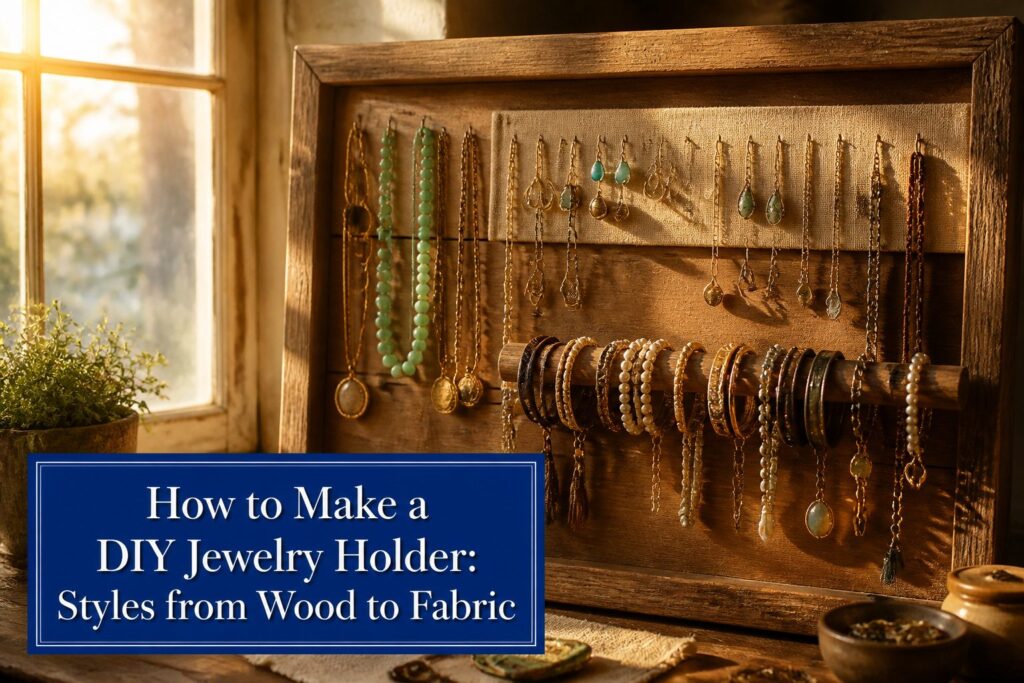
You can build any of these five jewelry holders in a single afternoon for under $20 in raw materials, or push toward $100 if you add a mirror and brass hardware.
The mistake most people make is drilling earring holes before they have sorted their collection by weight and length, which is the only way to get the spacing right.
A 13" x 17" back panel gives enough room without dominating a bedroom wall, and a 2′ x 4′ sheet of quarter-inch walnut plywood is small enough to cut without a table saw.
1. Gather Materials
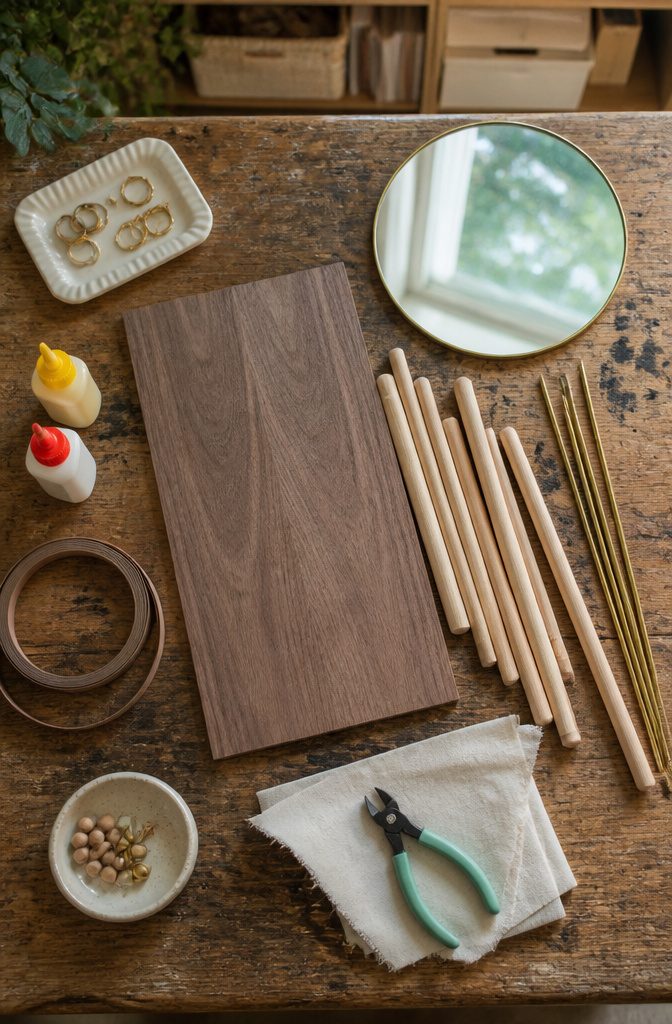
Walnut plywood gives these holders their backbone, and a 2′ x 4′ sheet at 1/4" thickness runs small enough to cut without a table saw.
Bracelets need something thicker to grip: 1" and 1.5" dowels do the job, with the wider size keeping stacked bangles from sliding. For necklaces, 6mm plywood strips stay light on the wall and leave room for the chain to fall straight.
Brass rods at 6mm and 8mm work for earring posts and finer details. Edge banding hides the plywood layers where the grain shows, and a basic wood glue bonded with super glue handles the joints faster than clamps alone.
Paint or stain covers mistakes; I lean toward stain on walnut because the grain earns its keep.
Monkey Hooks or a simple saw hook on the back gets it onto the wall.
A mirror from Target at $14.99 and a $12 ring tray from Container Store push the fancier builds toward a ceiling of about $100, though most stay well under that if you skip the mirror and work from scrap pine instead.
2. Cut Wood to Size
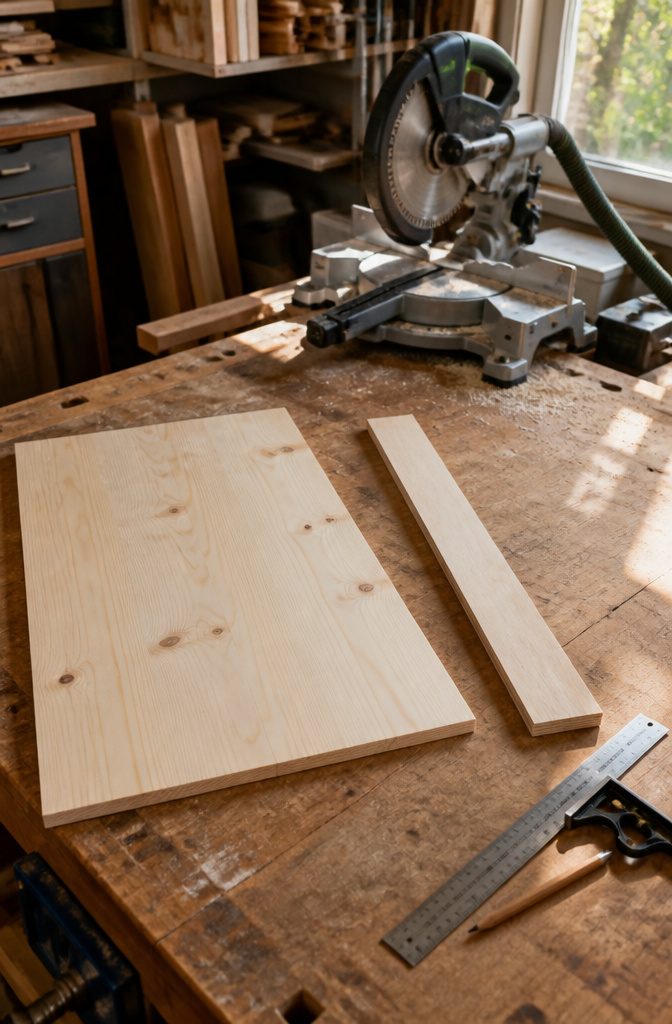
A jewelry organizer starts with a back panel cut to 13" x 17", which gives you enough wall space for earrings, bracelets, and a few necklaces without the piece feeling bulky in a bedroom.
For a necklace holder, a single strip of plywood at 2.5" wide by 18" long works better than something wider; the narrow profile keeps chains from sliding behind and tangling, and the 18-inch length fits most standard vanity widths without crowding.
Tray-style organizers need a different approach entirely.
Three-inch squares arranged in a grid keep rings and stud earrings separated, and the 3" x 3" compartments are shallow enough that you spot everything at a glance yet deep enough that a stud back does not roll out.
I would mark these out before making any cuts, since small trays punish an eighth-inch drift more than a wall panel does.
Use 6mm plywood for strip builds and common pine or white wood for anything framed.
A miter saw handles the crosscuts cleanly, and a table saw rips the plywood to width if you are building the tray base from sheet stock.
Sand every cut edge before assembly; splinters catch on fine chains, and stain will highlight roughness you did not catch early.
3. Assemble the Base
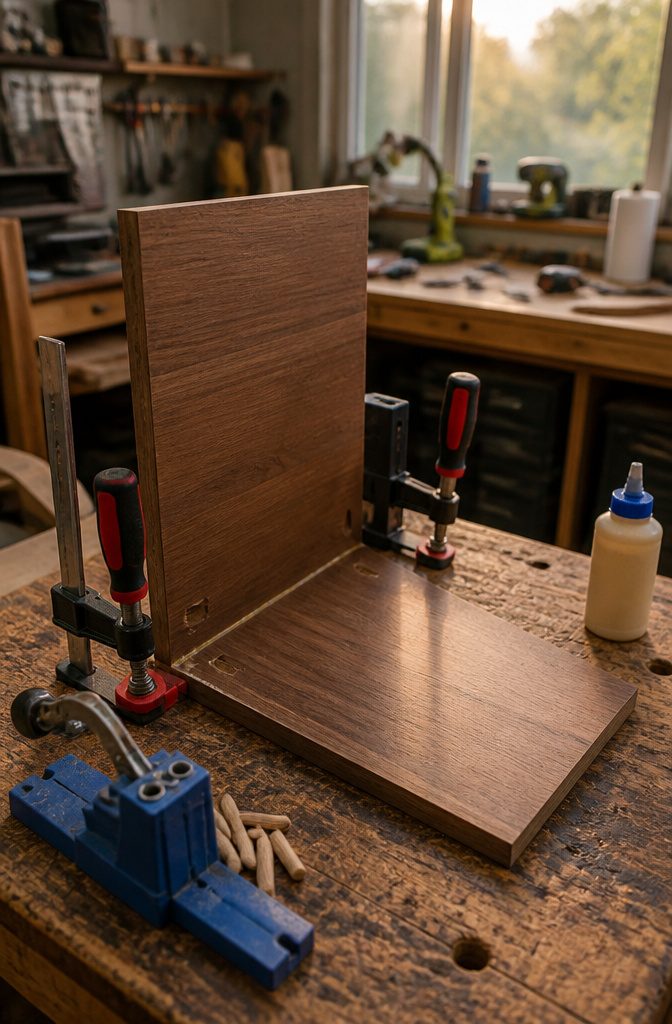
Wood glue is the cleaner choice for a jewelry holder that sits on a dresser, since screws through the face plate leave holes you will notice every time you reach for an earring.
Run a thin bead along the edge, spread it with a finger so none squeezes out the joint, and clamp the pieces for at least an hour.
I leave them overnight if I have the patience; the joint is stronger and I do not risk shifting the assembly by unclamping too early.
For a wall-mounted piece that carries more weight, or any build where you want the mechanical reassurance, screws set through pocket holes do the job without visible fasteners on the front.
A Kreg Jig makes these angled holes repeatable, and I think the tool earns its keep once you own it, though a simple butt joint with glue is enough for most jewelry holders.
If you do use screws, pre-drill so the wood does not split, especially near the ends where the grain runs short.
Bar clamps or pipe clamps apply even pressure across the joint; spring clamps are fine for small glue-ups but tend to rack the pieces out of square on anything wider than a hand span.
4. Drill Holes for Dowels and Hooks
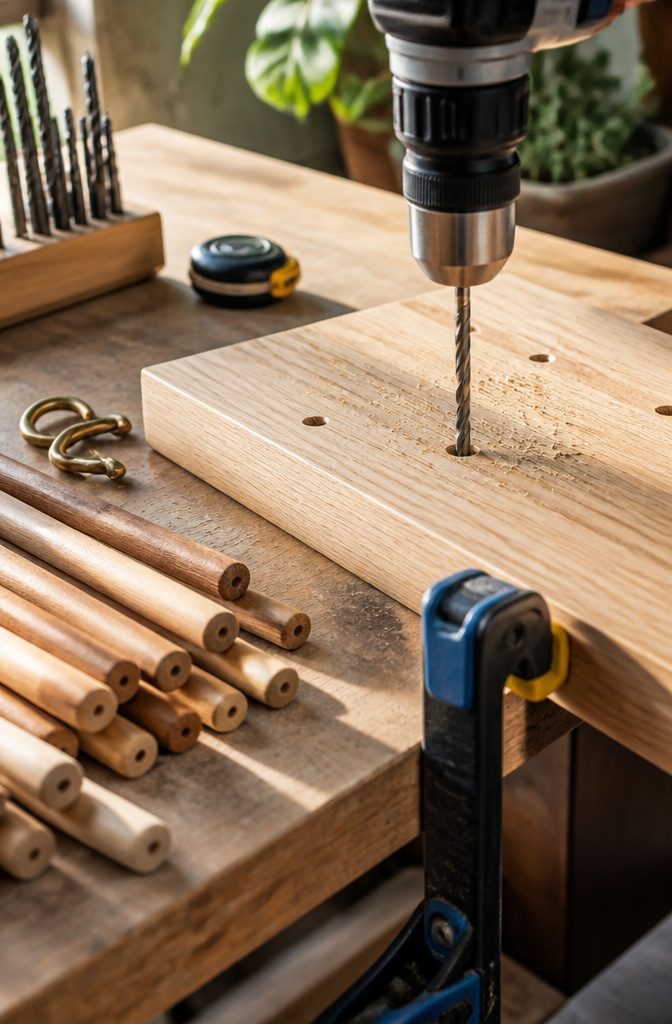
A 5/64″ bit works for stud earring holes spaced half an inch apart, while dangle earrings need a 5/32″ bit and a full inch of clearance.
Go slightly larger on the dangle holes if your backs are thick; the exact sizing matters less than giving the post room to slide without binding.
For bracelet storage, brass rods or dowels call for a 15/64″ hole, and necklace rods need 5/16″ to seat properly.
A Forstner bit cleans up the back side for recessed knots or magnets, keeping the organizer flat against the wall. One-inch Forstner bits work well for dowel shelves if you are building that style instead.
Spacing is where I would separate the pieces by what they are. Necklaces tangle if crowded, so I would give them more horizontal room than bracelets.
Earrings need vertical density but still enough gap that a stud does not knock its neighbor. Drill straight; a press helps, but a steady hand and a tired forearm still get it done.
5. Finish the Wood
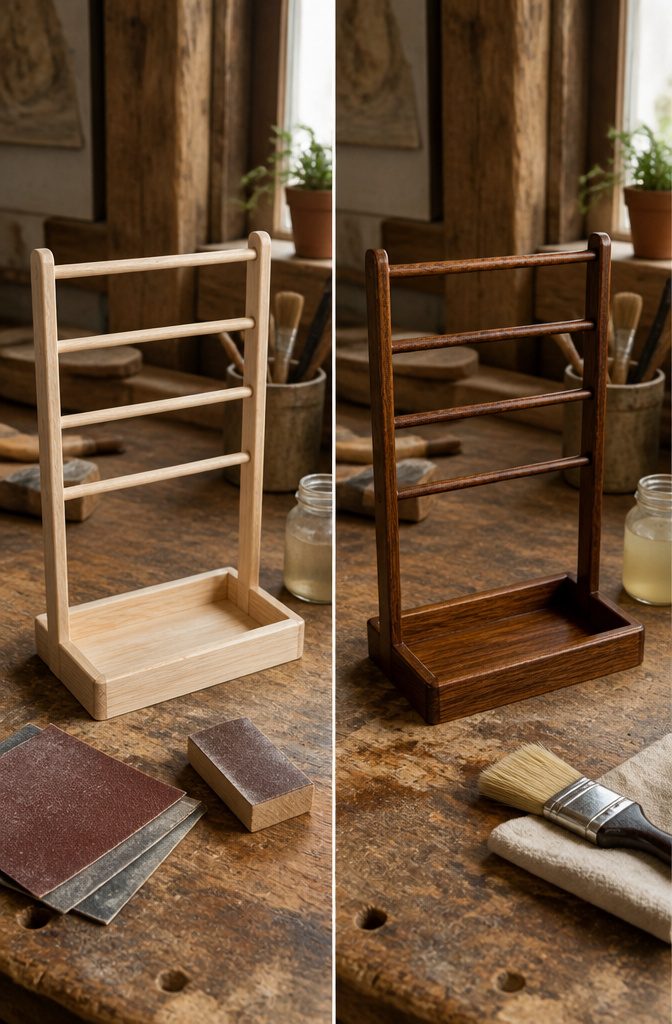
Raw wood carries splinters and mill marks that snag fine chains, so sanding comes first.
I start with 120 grit to knock down the raised grain and saw marks, then move to 220 grit to smooth the surface the jewelry will actually touch.
Sand to 220 grit as the finishing step; that is the one that matters most for a piece you will handle daily.
What goes on after sanding depends on where the holder will live and what the wood is.
Paint, like the white acrylic used on those vintage boxes, hides cheap plywood and brightens a dark bathroom corner. Stain lets the grain read on a nicer board and warms a bedroom wall.
A clear sealant or varnish protects either finish from the humidity that tarnishes metal findings and warps cheap joints. Two coats of paint or one of stain followed by sealant is the usual balance between coverage and bulk.
The 30-degree angled cut on that plywood strip will drink more finish at the end grain, so I feather an extra pass there.
220 grit is the touch that matters, because anything coarser leaves scratches the stain will spotlight and the paint will not quite hide.
6. Attach Hanging Hardware
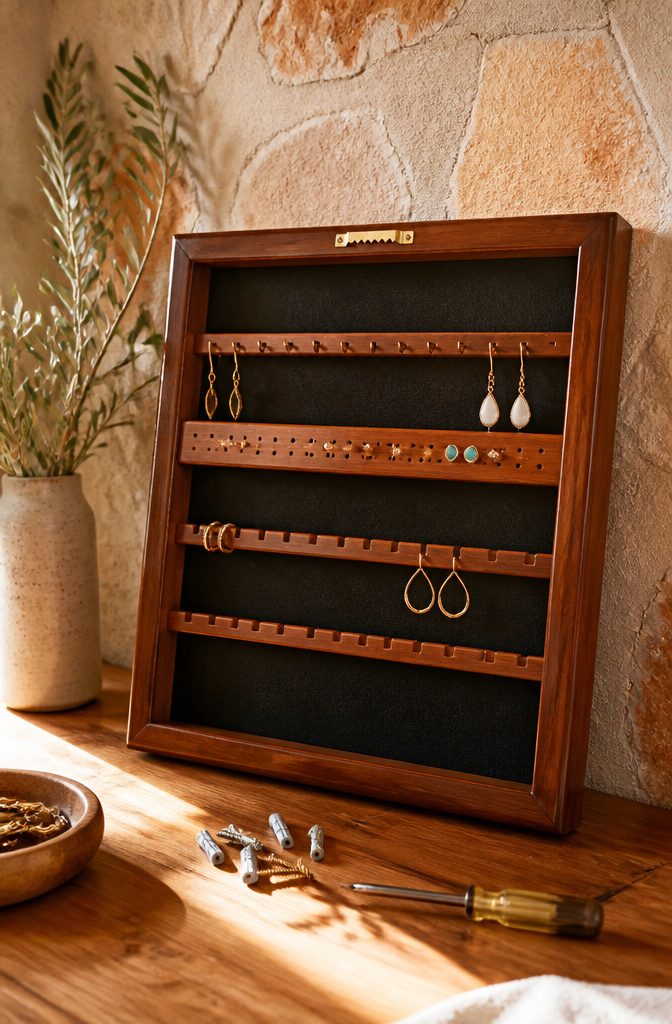
Sawtooth hangers are the standard choice for most wall-mounted diy jewelry holder builds because they sit flat and carry weight close to the wall.
I center one near the top edge on pieces under about 18 inches wide; anything larger gets two, spaced a third of the way from each corner so the frame stays level.
Drywall anchors rated for 50 lb hold most wooden holders fine, but a stud finder removes the guesswork if you own one. I skip the anchors entirely when I hit solid wood.
For renters or lighter fabric-backed boards, 3M picture hanging strips save patching later. Check the weight limit printed on the package, usually well below what metal hardware handles, and expect adhesive strips to fail in humid bathrooms.
I have used them successfully on cork and foam-core organizers under two pounds, but I would not trust my grandmother’s vintage brooch collection to adhesive alone.
7. Hang and Organize Jewelry
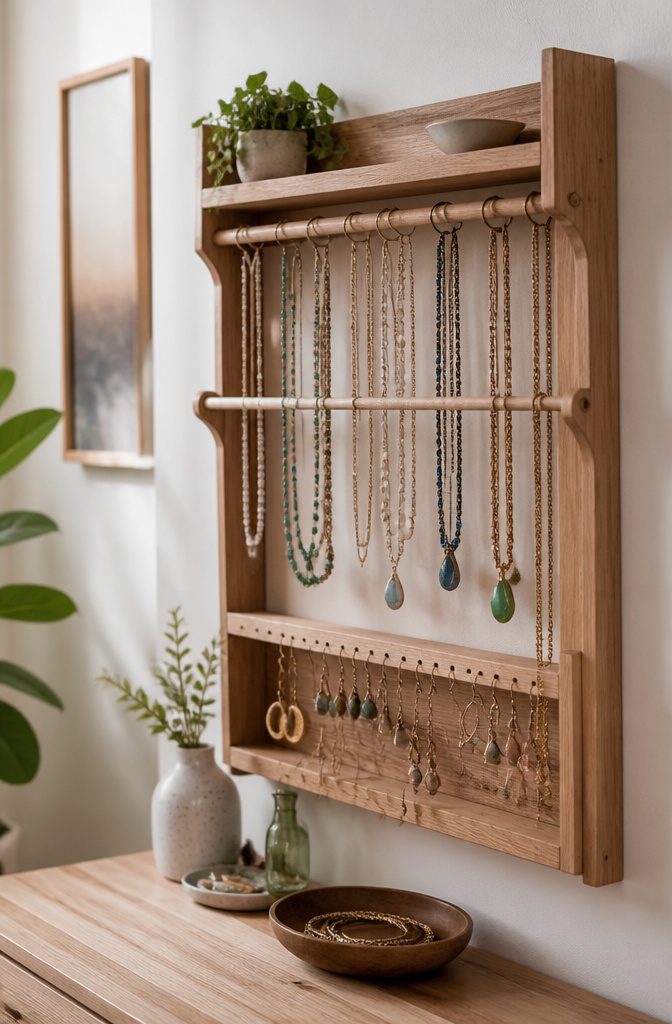
Necklaces hang cleanest on dowels, where each chain drops straight and the next one sits an inch or two away.
That spacing matters more than I expected when I first built one; anything under an inch and the clasps find each other overnight.
Earrings pair naturally on small cup hooks or a strip of wire mesh, posts through the grid so both halves of a set stay together.
Rings slide into shallow bowls or the compartments of a divided tray, where the band faces up and the stone does not knock against metal.
The layout should shift as your collection shifts.
I have redrilled for wider dowels when chokers gave way to pendants, and swapped mesh for finer gauge after buying more studs. A jewelry holder that cannot be adjusted is a holder that eventually fails.
Wall-mounted pieces with a sawtooth hanger make this easier than tabletop builds; you mark new holes, move a row, and keep the whole piece on the wall while you work.
8. Wooden Dowel Holder
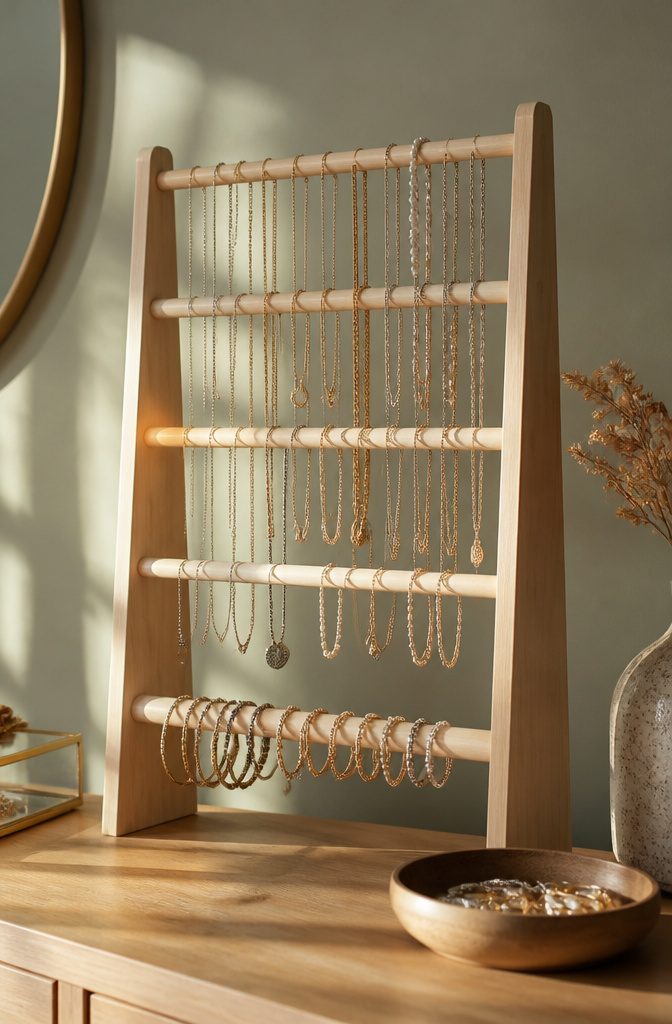
A wooden dowel holder lines up horizontal rods across a simple frame, each piece of jewelry draped over its own bar so chains hang straight and bracelets rest in open loops.
The spacing between dowels matters more than most people figure at first: leave too little room and thick cuffs crowd each other, too much and you waste wall space on empty air.
I have settled on about two inches as the workable minimum for most collections, though your own pieces will tell you if that needs adjusting.
The dowel diameter itself decides what you can actually store. A half-inch rod supports heavier necklaces without bowing over time, while quarter-inch stock works for light chains but will sag under a loaded charm necklace or a solid silver cuff.
Go with half-inch birch or oak if you own mixed weights, since the slight extra bulk looks cleaner than a row of drooping rods.
Installation is straightforward: drill matching holes through two upright posts, glue and pin the dowels in place, then mount the frame to wall studs.
The whole build takes an afternoon and costs less than a basic store-bought rack, and the open front leaves everything visible at a glance.
9. Wall-Mounted Earring Organizer
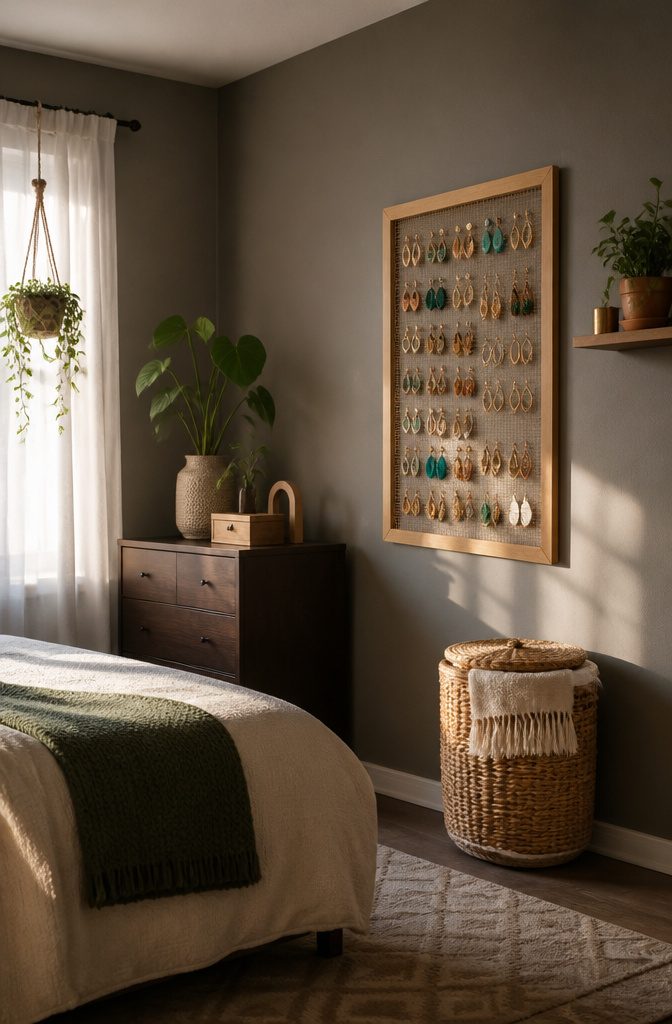
A wall-mounted earring organizer lives or dies on whether you can actually see what you own.
Mesh backing, the kind stretched across a recycled picture frame, keeps every pair visible at a glance; solid plywood with drilled holes hides the backs and can turn a quick morning scan into a fishing expedition.
I would pick mesh for a large collection and reserve the drilled-board style for studs I wear on rotation.
Spacing is where the build gets specific. Stud earrings need holes about 1/2 inch apart if you are drilling, while dangle earrings want 1 inch to keep the hooks from tangling.
Go with a 5/64 inch bit for studs and a 5/32 inch bit for dangles; the source build admits a slightly larger bit would have handled thicker backings better, so err bigger if your collection runs to oversized closures.
For the board itself, 1/2 inch plywood keeps the weight reasonable on drywall anchors, though a solid 3/4 inch walnut slab feels more substantial and lets you skip edge banding.
The backing choice also affects how the organizer hangs. A mesh-front frame needs only a picture hook; a drilled plywood panel wants a recessed knot or pocket on the reverse so the mounting hardware does not bump the wall crooked.
A 1/4 inch Forstner bit on the back side creates that pocket cleanly.
10. Tray-Style Organizer
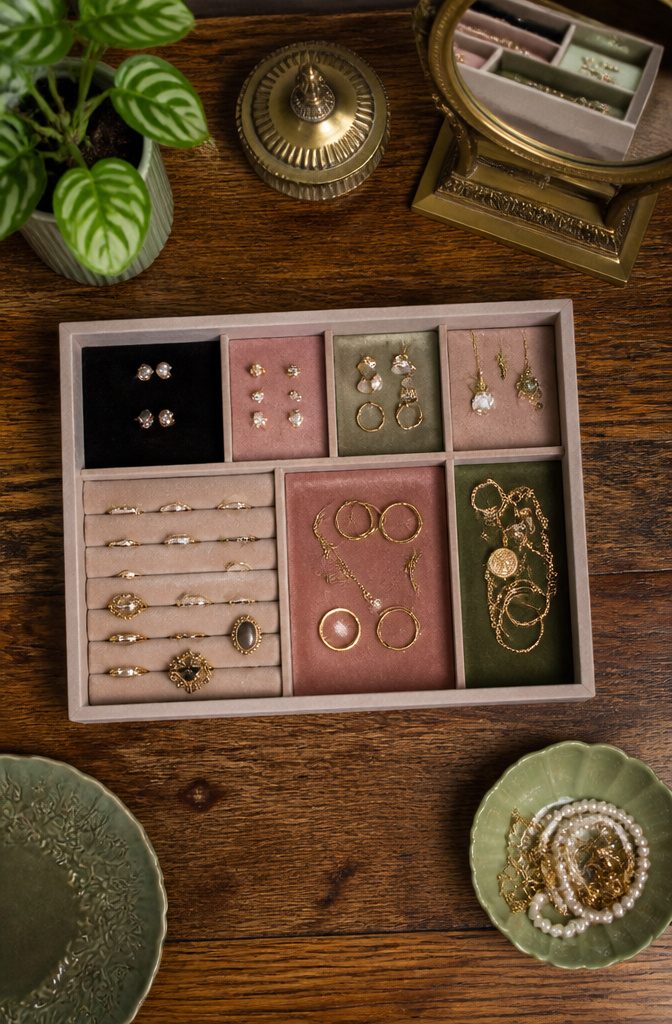
A tray-style organizer sits flat on a dresser and keeps rings, earrings, and small pendants sorted into their own compartments.
I like the 3 x 3 inch square for stud pairs or a stack of thin bands; anything smaller and pieces slide together, anything larger wastes space on a crowded vanity.
Velvet or felt lining keeps metal from scratching and stops beads from rolling, though a thin cork sheet works if you want something you can wipe clean.
This format suits people who grab jewelry while dressing, not while standing at a wall. The whole unit slides into a drawer when guests come over, which I find more practical than mounted holders that become part of the room.
Compartment depth matters more than you expect: under an inch, and necklaces pile over the rim; over two inches, and you are fishing for small studs with your fingertips.
One inch to an inch and a half hits the balance for most collections.
Wood or pressed board forms the base, with glued dividers or a grid of thin strips you can rearrange. A simple version needs only a shallow box, a ruler, and a strip of lining material cut to fit.
A tray eats dresser space that wall options spare. For renters or anyone who rearranges furniture, that portability wins.
11. Fabric-Covered Board
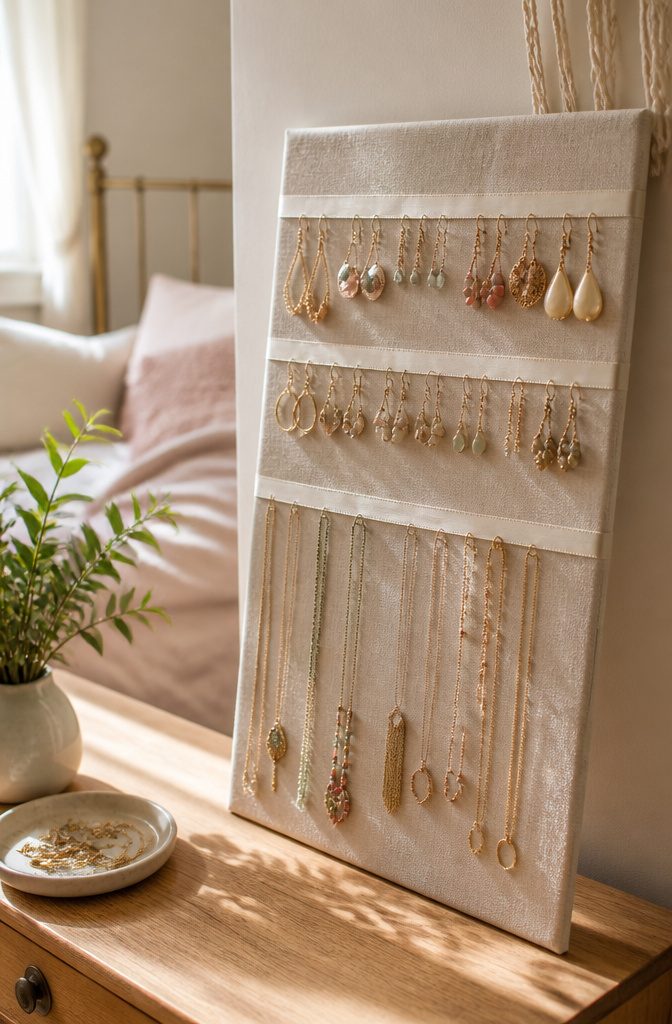
A fabric-covered board earns its place in a small bedroom or rental where drilling holes is not an option.
Linen, velvet, or a thick cotton duck stretched tight over a flat board gives earrings and lightweight pendants something to grip without the weight of a wooden frame.
I would avoid anything too silky; studs slide right off satin, and you want pairs staying together where you can see them.
Ribbon or narrow dowels tacked across the front in a grid add rows for hook earrings and keep necklaces from tangling.
The fabric choice matters more than the frame underneath, since a soft weave hides pinholes and lets you rearrange pieces without tearing the surface.
Velvet in particular holds post earrings upright, which saves the frustration of hunting for backs in a dish.
This style works best for lightweight pieces. Heavy chains or thick cuff bracelets will sag the fabric or pull ribbon loose over time, so I would limit it to what weighs less than a few ounces per item.
You get a holder that weighs almost nothing on the wall and costs less than a store-bought frame.
Tools You Need
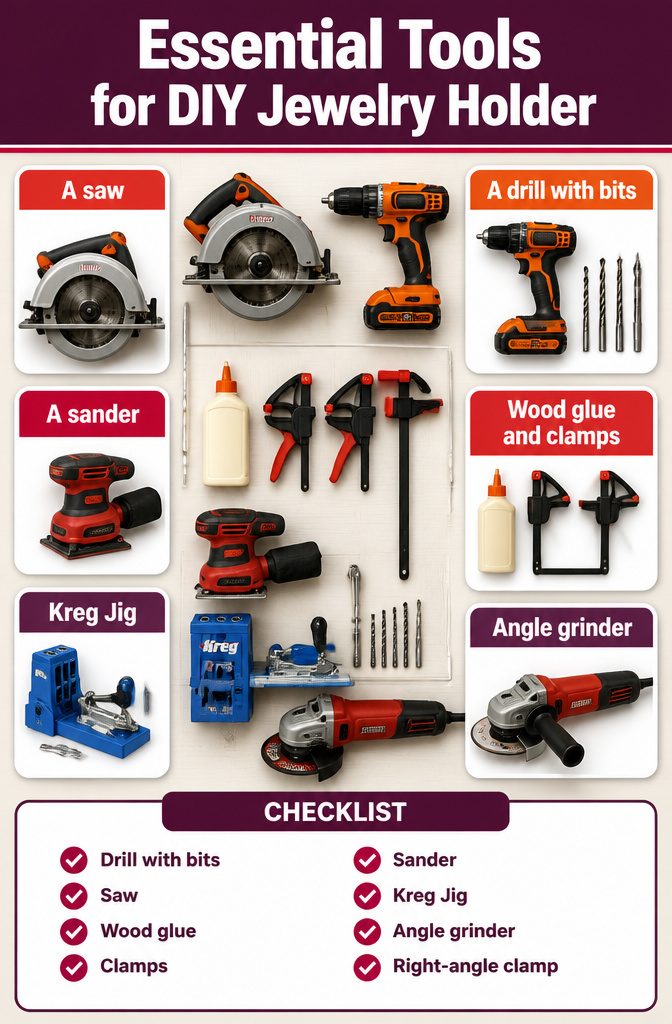
A drill with the right bits drives every build in this article, from the 5/64″ pilot holes in a wooden frame to the 5/16″ openings for cup hooks.
Match the bit to the fastener; a loose hole strips the screw and splits the wood.
- A saw sets the project’s tone. A circular saw or miter saw handles straight cuts for wall-mounted frames and tray bases. A jigsaw works for nothing in these five designs, though it earns a place if you later add curves.
- Wood glue plus clamps buys you time to align pieces before the screws go in. Trigger clamps suit small dowel holders; longer bar clamps hold a full frame square while the glue sets.
- A sander, benchtop or handheld, removes the marks that say homemade. The micro zip sander reaches corners a belt won’t touch.
- The Kreg Jig is optional until it isn’t. Pocket holes hide the joinery on the framed mirror case and any piece where the screws show from the front. The right-angle clamp pairs with it; the tool is only half as useful without something to hold the 90 degrees true.
- An angle grinder with a metal wheel appears just once, for cutting hardware if you add a custom hanging bracket. Skip it and use a hacksaw, or buy the hook premade.
Customize for Your Collection
A diy jewelry holder only earns its wall space if it fits what you actually own.
I start by sorting everything into three piles: necklaces that tangle, earrings that disappear, and bracelets that slide. Necklaces need vertical drop, so I space hooks or rods at staggered heights, roughly an inch apart, with longer strands on top.
Earrings pair well with quilter’s template plastic punched every half-inch for studs, or shallow compartments about 3 by 3 inches for drops. Rings sit tightest, usually in divided trays or shallow boxes lined with felt.
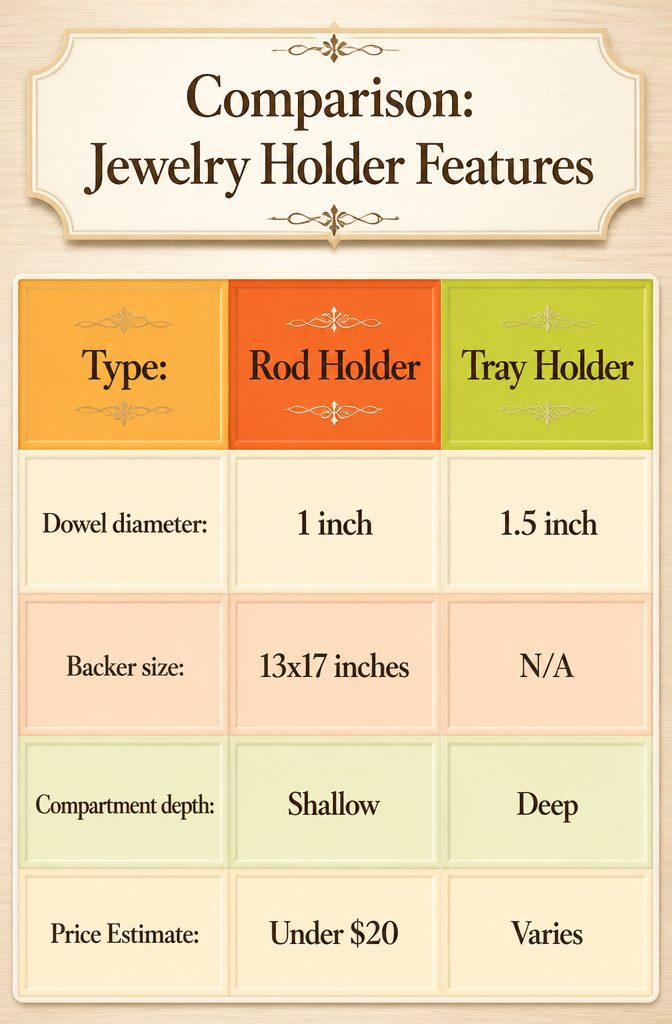
Dowel spacing depends on bracelet diameter. A 1-inch brass rod handles most bangles, while a 1.5-inch wooden dowel, hung from a closet rod holder, keeps stacks from crowding.
For the frame itself, a 13 by 17 inch backer works as a standard wall piece, but I would nix the shelf and add height if necklaces run past 24 inches.
Compartment depth matters too: chunky cuffs need deeper sections than flat chains. The build stays under $20 in materials if you plan the cut list before buying anything, and scrap wood works fine for backers or shelves you will not see.
Repurpose What You Have
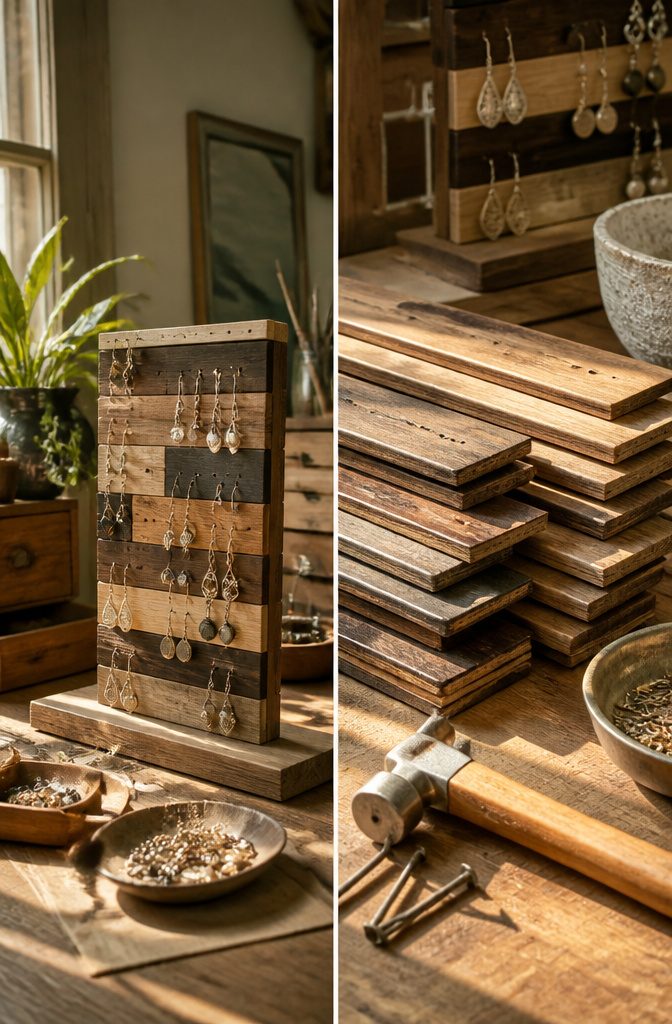
A stack of wood floor samples from the same brand glues into a patchwork backing for earrings or lightweight chains.
The boards fit tongue-and-groove only when matched, so grabbing eight mismatched strips from a hardware store discard pile will frustrate you.
Wood glue and a few screws with broad heads hold the assembly flat; picture hanging strips mount it without drilling into rental walls.
Old wooden boxes work better than floor samples for anything heavy. An unfinished box with removable dividers lets you paint inside and out with two coats of white acrylic, then line the compartments with felt or fabric scraps.
A vintage tic-tac-toe tray, split into square wells, sits on a dresser as a ring and bracelet tray with zero construction.
Driftwood and found branches have character, but they split under screw pressure and rarely take a smooth hook. For a wall piece that carries weight, new lumber wins on grain consistency and predictable drilling.
Repurposing saves the $20 or less that fresh materials typically run, and it keeps usable wood from the bin. Sorting, cleaning, and sometimes stabilizing salvage eats the afternoon that a straight pine board would skip.
Frequently Asked Questions
What materials do I need for a DIY jewelry holder?
Walnut plywood at 1/4 inch thickness forms the backbone, plus 1 inch and 1.5 inch dowels for bracelets, 6mm plywood strips for necklaces, and brass rods at 6mm and 8mm for earrings.
Wood glue, super glue, edge banding, and paint or stain finish the piece; Monkey Hooks or a saw hook handle wall mounting. Most builds stay well under $100, and scrap pine cuts that further.
How do I hang my DIY jewelry organizer?
Sawtooth hangers sit flat and carry weight close to the wall; center one on pieces under 18 inches wide, or use two spaced a third from each corner on larger frames.
Drywall anchors rated for 50 lb work for most wooden holders, though hitting a stud removes the need entirely.
For renters or lighter fabric boards, 3M picture hanging strips save patching later but carry less weight and can fail in humid bathrooms.
Can I customize my jewelry organizer?
Yes. Adjust dowel spacing to your bracelet diameters, swap mesh for drilled holes as your earring styles change, and add or remove rows to fit longer necklaces or new collections.
A 13 by 17 inch backer works as a standard, but you can add height for necklaces past 24 inches or swap the shelf for more vertical drop.
The builds are designed to shift with your collection rather than lock you into one layout.
How can I make a DIY jewelry hanger?
Cut a plywood strip to 2.5 inches by 18 inches with 30 degree angled ends, sand and stain or paint it, then glue five dowels at staggered lengths (9, 13, 18, 13, and 9 inches) with trigger clamps until dry.
Nail a saw hook to the back for wall mounting; the whole build takes an afternoon and costs less than store-bought alternatives.
What is the best way to organize a lot of jewelry?
Sort into necklaces that tangle, earrings that disappear, and bracelets that slide, then assign each type its own hardware.
Necklaces need vertical drop on dowels or hooks spaced about an inch apart with longer strands on top; earrings pair on mesh or in 3 by 3 inch compartments; rings sit in divided trays lined with felt.
Wall-mounted pieces with sawtooth hangers let you redrill and rearrange without removing the whole unit from the wall.





